

 転妻はりー
転妻はりー無事にブログ開設できたし、記事も書き始めたわ!
 転妻はりー
転妻はりーところでこのブログって見られているのかしら?
 転妻はりー
転妻はりー人が来ているか分からないわ!これじゃモチベーション保てない!
転妻はりーなになに?・・・Googleアナリティクスを使えば、読者がどれくらいいるのか分かるのね?
転妻はりーGA4?UA?何それ?
 転妻はりー
転妻はりーお金かかりそうだし面倒ね……また今度でいっか!
 まさる
まさるGoogleアナリティクスは無料で導入できるので一緒にやりましょう!
転妻はりーなになに?熱量すごいわね。
まさる稼げるブログを運営したいなら、Googleアナリティクスは必須ツールなのでサクッとやっちゃいましょう!
 転妻はりー
転妻はりーパソコン苦手だから丁寧に教えてよ?
まさるもちろんです!
この記事ではブログ歴1年以上の僕が、誰でもGoogleアナリティクスを導入できるように、たくさんの画像を使って解説していきます。
まさる記事を読み進めながら一緒にやれば確実にできるように丁寧に解説していますよ!
最後まで読む3つのメリット。
- Googleアナリティクスが導入できる
- Googleアナリティクスで設定するべき項目が分かる
- Googleサーチコンソールとの連携方法が分かる
Googleアナリティクスは「稼げるブログ」に無くてはならない存在です。
 まさる
まさる画像を見ながら一緒に作業を進めて、最強のブログツールを手に入れましょう!

まさる
☆独立系FP×Webライター×ブロガー
- 3歳と2歳の息子を育てながら月10万円以上稼ぐ
- 年間100記事以上執筆
- 10記事以上で検索上位に表示
☆保有資格
- 1級ファイナンシャル・プランニング技能士(FP1級)
- 全日本SEO協会SEO検定1級
- 宅地建物取引士
- 日商簿記2級
\ 詳しいプロフィールはこちら /
Googleアナリティクスとは?
まさるまずはGoogleアナリティクスについてカンタンに解説します。
Googleアナリティクスは無料で使えるGoogle公式分析ツールです。
Googleアナリティクスを使えばわかること
- ユーザーの訪問状況を把握する機能
…アクセス数、ユニークユーザー数、セッション数、平均セッション時間、ページビュー数など - ユーザーの行動を分析する機能
…訪問ページ、離脱ページ、参照元/メディア、デバイス、OS、地域など - 目標達成を支援する機能
…コンバージョン率、コンバージョン数、コンバージョン値など - 広告効果を測定する機能
…クリック率、コンバージョン率、ROASなど - サイトパフォーマンスを改善する機能
…ページエラー率、離脱率、滞在時間など
アクセス数や訪問されているページ、離脱率などを分析すれば読者が自分の理想通りの行動を取ってくれているかわかります。
ブログで稼ぐためには、読者が「自分の想定通りに動いていくれること」が求められます。
例えば……
- 集客用の記事にアクセスしてもらって、買って欲しい商品を紹介する記事に飛んで購入してくれている
- 特定の記事から離脱してしまっている
普通なら、上記のような読者の行動なんて分かりません。
ところが、Googleアナリティクスを使えば「訪れた読者がどのように行動しているか」手に取るように分かります。
Googleアナリティクスのことを書いていない人は、下記の記事を参考にコピペで完璧なプライバシーポリシーを作っちゃいましょう。
 まさる
まさるUAのサポートは2023年7月1日で終了しています。
まだ、UAを使っている人は記事後半の移行作業を速やかに行うようにしてくださいね。
まさるブログを開設したら、真っ先に導入するようにしましょうね!
【GA4対応】SWELLでGoogleアナリティクスを3ステップで設定
まさるここからSWELLでGoogleアナリティクス(GA4)を設定する方法を解説していきます。
SWELLでGoogleアナリティクスを設定する方法は次の2つです。
- プラグイン「SEO SIMPLE PACK」を利用する
- カスタマイズの「高度な設定」を利用する
まさるこの記事では1番簡単な「SEO SIMPLE PACK」を使用した方法を紹介していきます。
次の3ステップで導入できます
- Googleアカウントを作成する
- Googleアナリティクスアカウントに登録する
- 測定IDをWordPressに設置する
Googleアカウントを作成する
Googleアナリティクスを利用するにはGoogleアカウントが必要になるので、作成していきます。
まさるGoogleアカウントはこちらから登録できます。
Googleアカウント作成手順はこちら
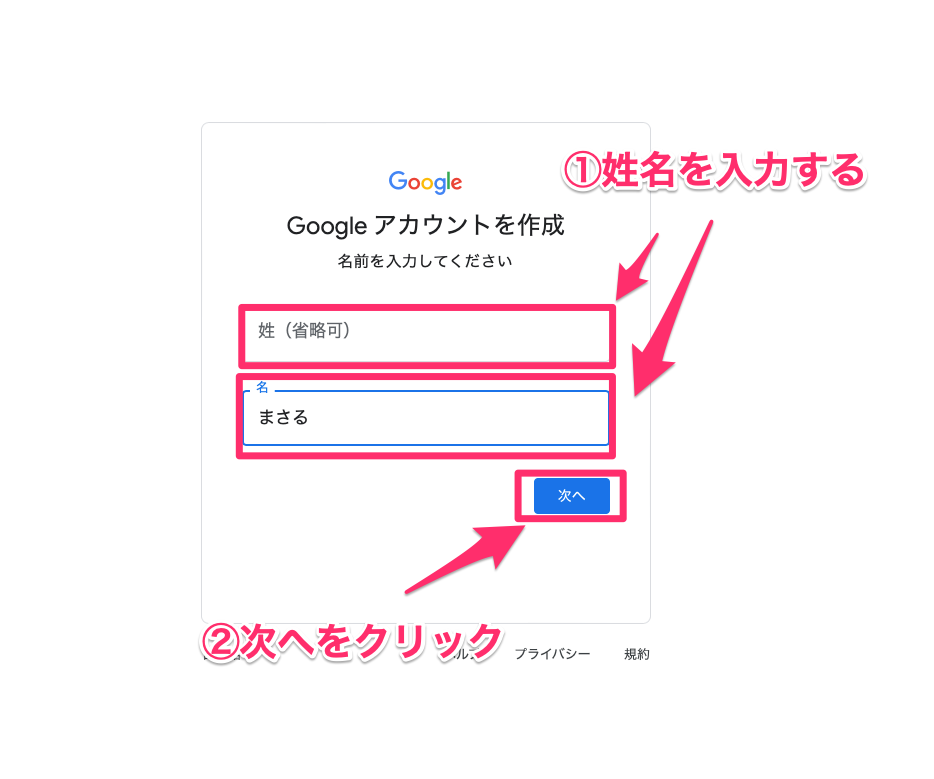
姓名を入力
- 姓名を入力
- 「次へ」をクリック
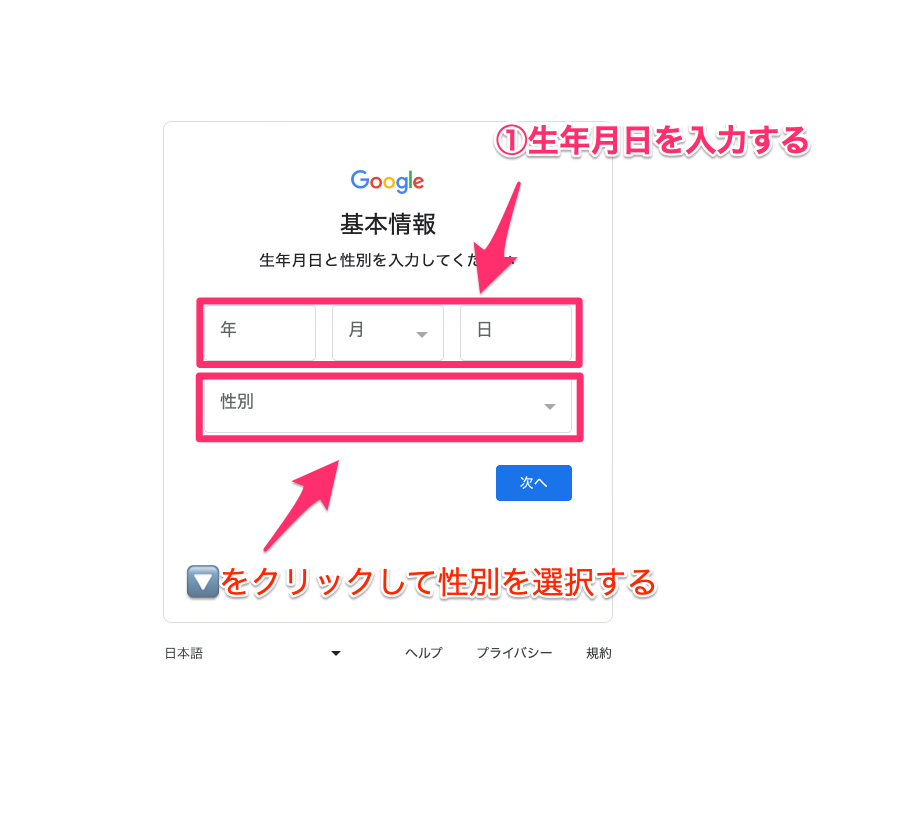
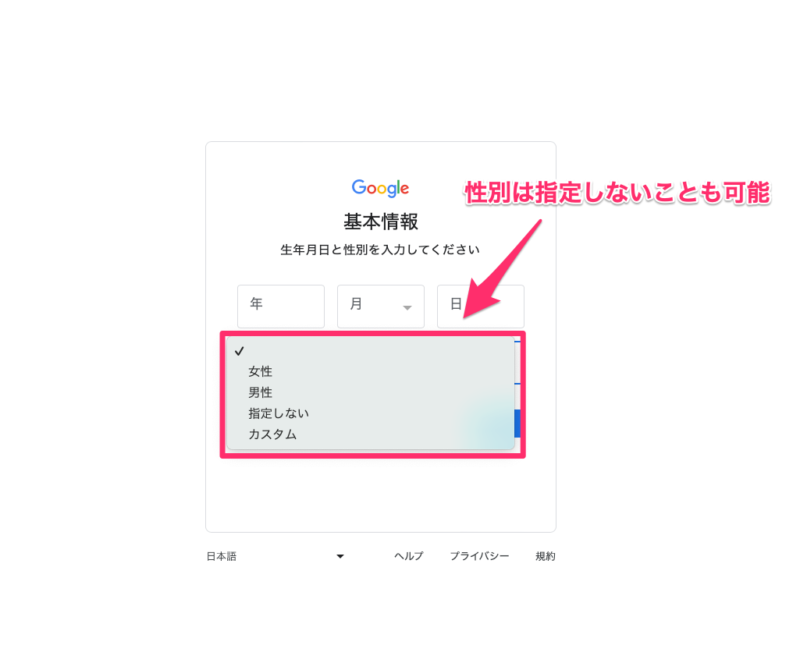
生年月日と性別を入力
- 生年月日を入力
- 性別を選択
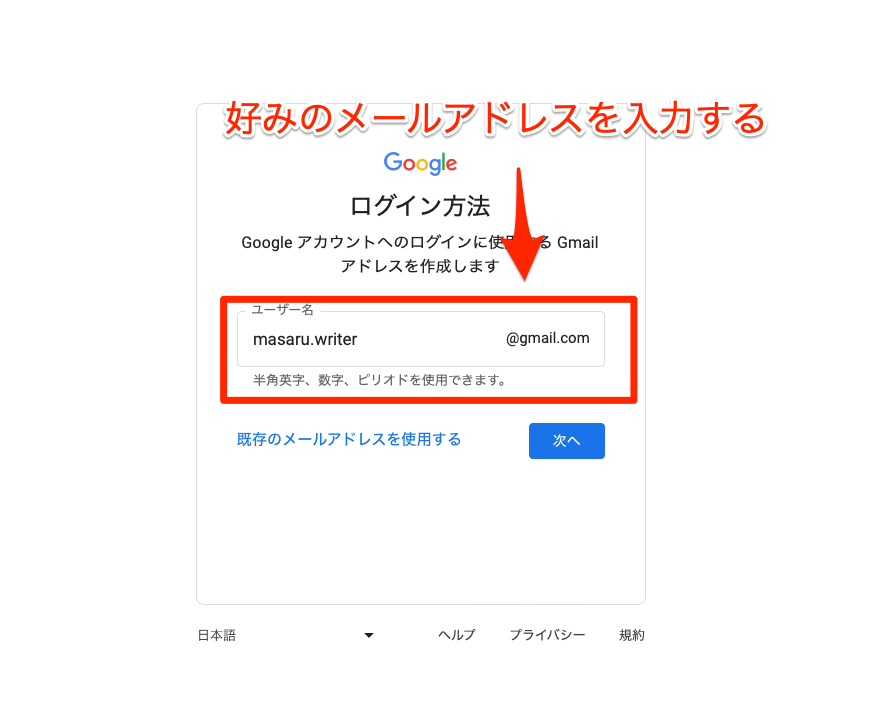
メールアドレスを設定
好みのメールアドレスを考えて入力
パスワードを設定
考えたパスワードを2回入力
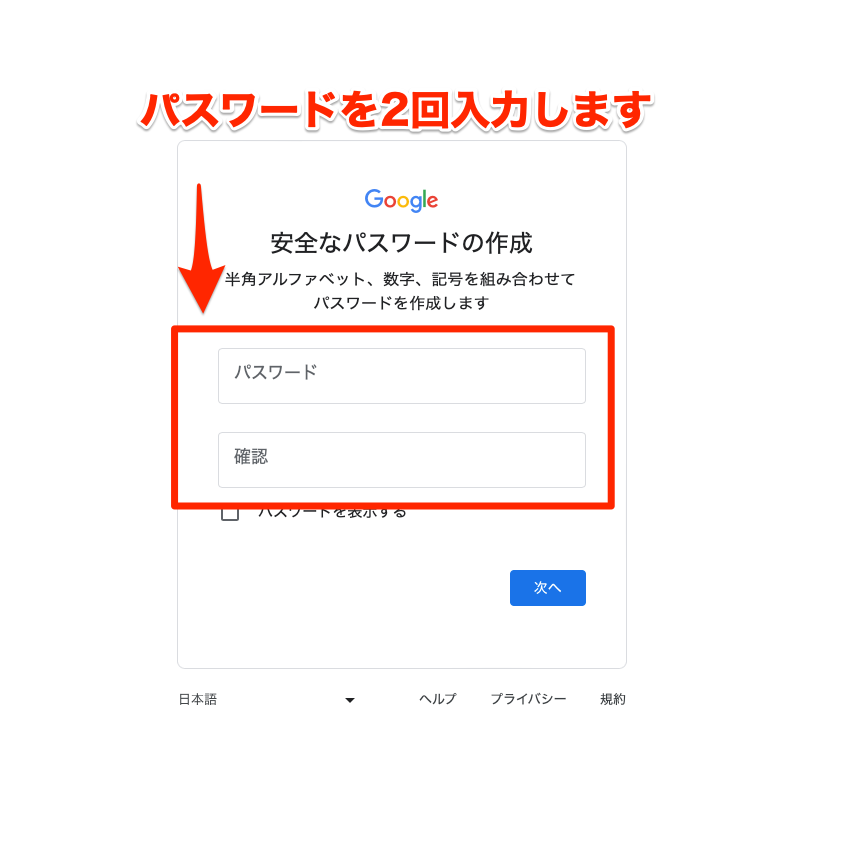
ランダムにパスワードを作成してくれるツールがオススメです。
まさる僕はほとんど全てのパスワード管理をツールに任せています。
再設定用のメールアドレスを設定
普段使っているメールアドレスを入力

ログインできなくなった時に必要なので、必ず設定しておきましょう。
電話番号を入力
アカウント確認用の電話番号を入力
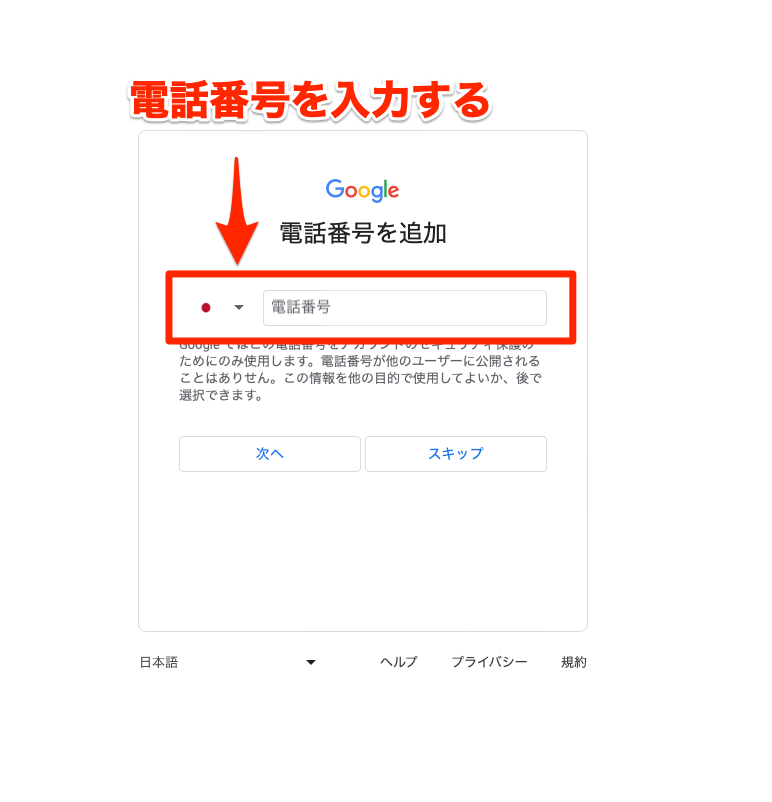
こちらも後で設定可能です。
まさる僕は設定していないので、お好みでどうぞ。
アカウント名とアドレスを確認
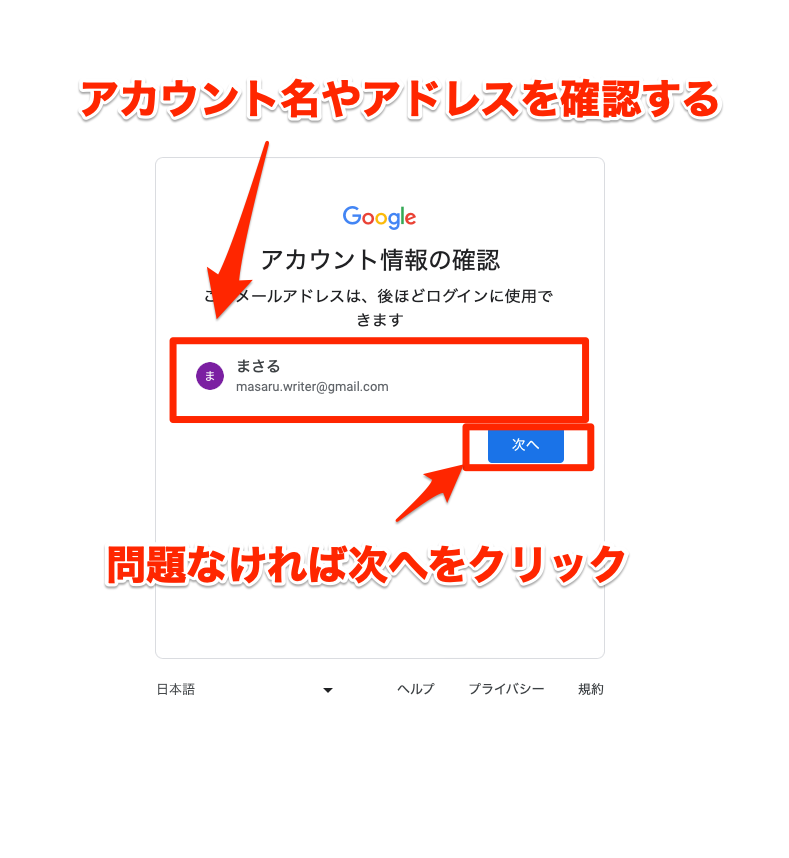 まさる
まさる問題なければ「次へ」をクリックします
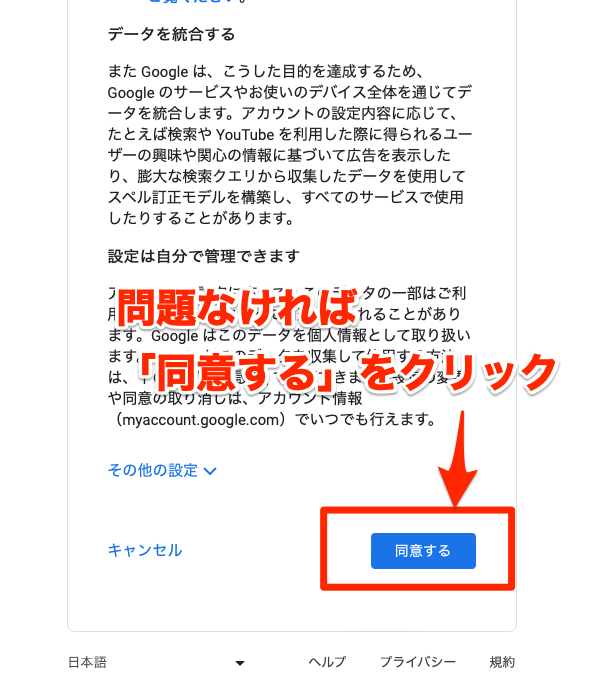
プライバシーポリシーと利用規約を確認
内容を確認して問題なければ「同意する」をクリック
 まさる
まさる以上でGoogleアカウントが作成できました
Googleアナリティクスアカウントに登録する
すでにGoogleアナリティクスに登録している人は、下のボタンで次のステップまで飛ばしてください。
まさる下記のボタンからGoogleアナリティクスの公式サイトに飛びます。
Googleアナリティクスアカウントの設定方法
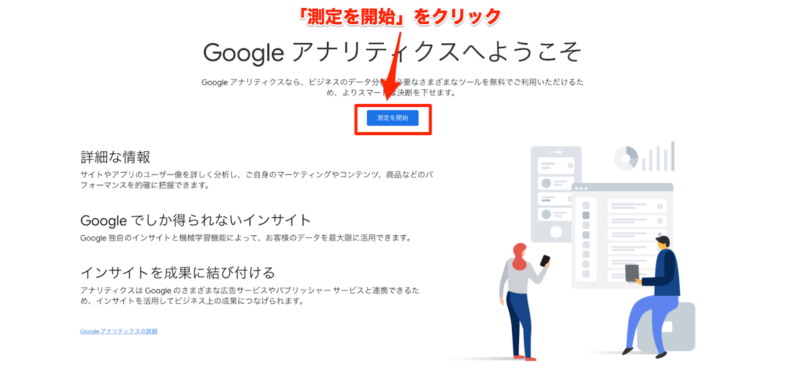
「測定開始」をクリック
アカウント名を入力
好きなアカウントを半角で2〜10文字で設定してください
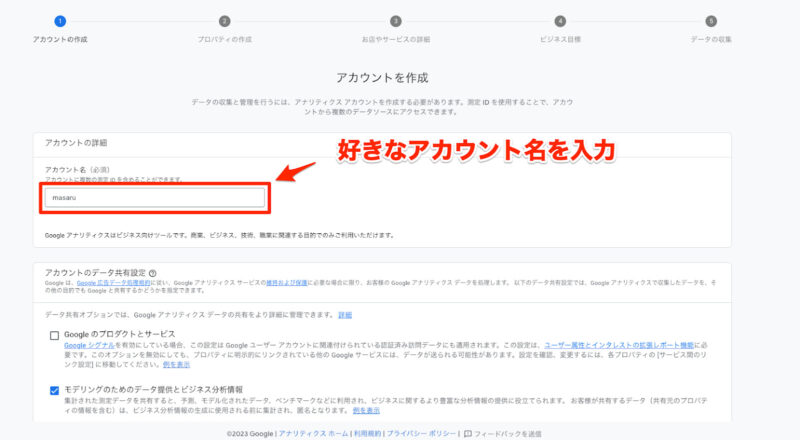
下にスクロールして「次へ」をクリック

プロパティを設定
下記の項目を設定します
- プロパティ名を入力(ブログ名など)
- 「日本」を選択する
- 「日本円(¥)」を選択する
- 「次へ」をクリック

プロパティ名を入力(ブログ名など)
「日本」を選択する
「日本円(¥)」を選択する
「次へ」をクリック
ビジネスの詳細を設定
下記のように設定します
- 業種を選択(1番近いもの)
- ビジネス規模を選択(小規模)
- 「次へ」をクリック
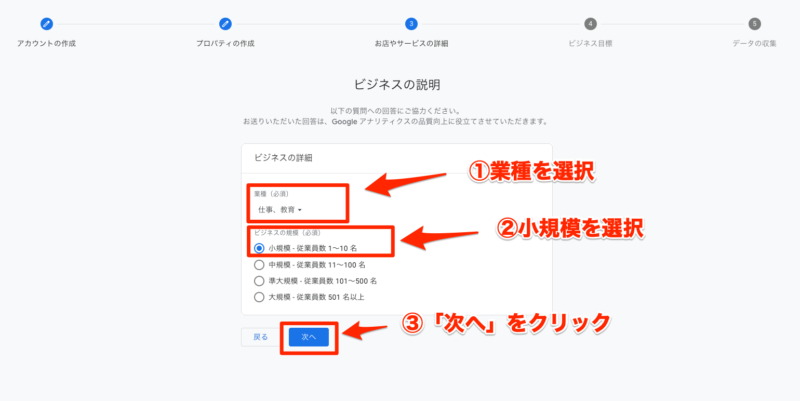
業種を選択(1番近いもの)
ビジネス規模を選択(小規模)
「次へ」をクリック
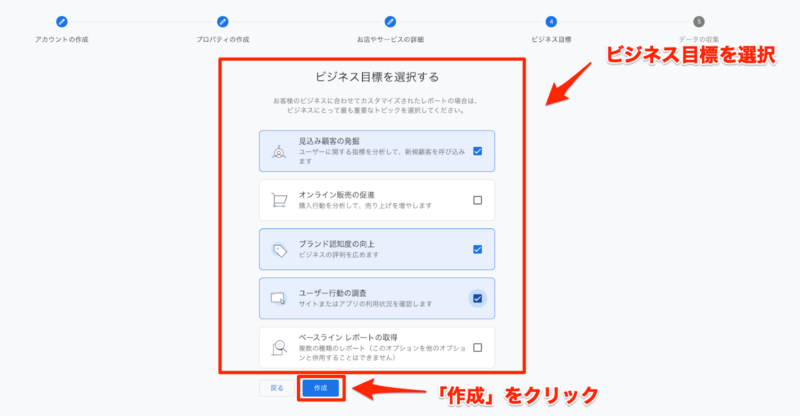
ビジネス目標を設定
次の3つを選択します
- 見込み顧客の発掘
- ブランド認知度の向上
- ユーザー行動の調査
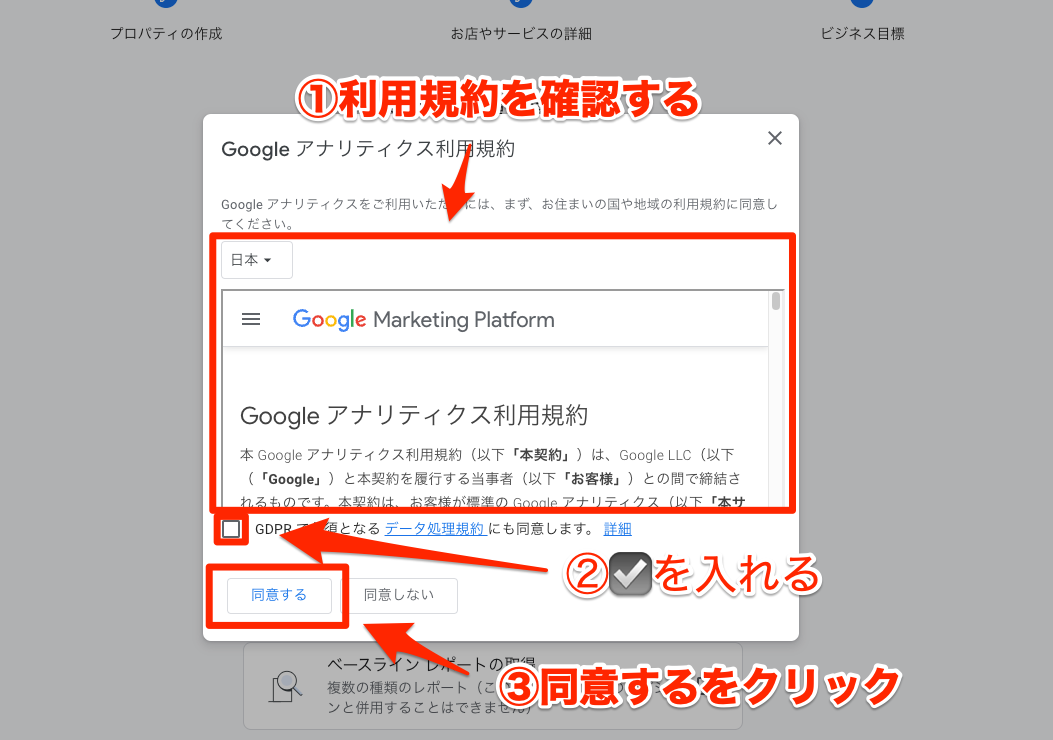
Googleアナリティクスの利用規約を確認
- 利用規約を確認する
- チェックを入れる
- 同意するをクリック
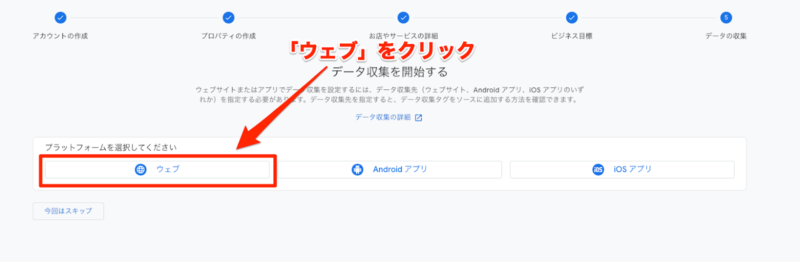
登録するWebサイトの情報を入力
「ウェブ」をクリック
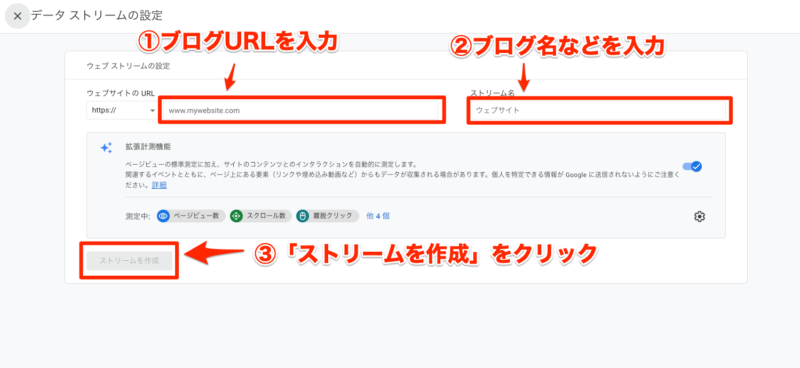
さらに下記の項目を入力していきます
- ブログのURLを入力
- ストリーム名を入力(ブログ名など)
- 「ストリームを作成」を入力
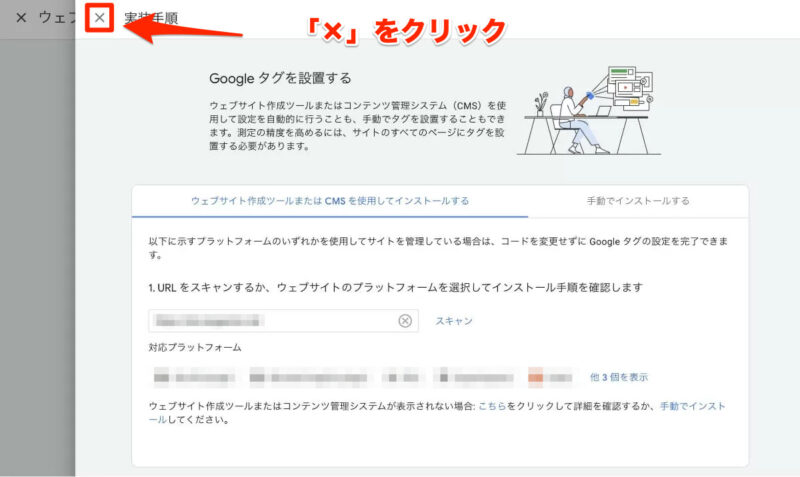
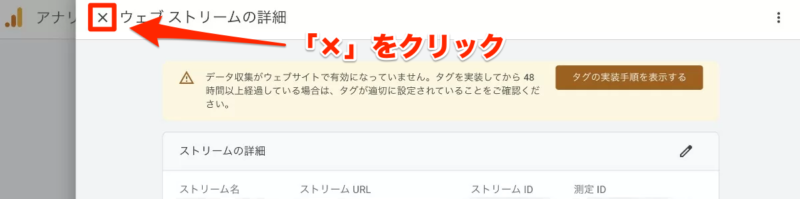
実装手順を「×」で閉じる
ひとまず閉じておきます
ウェブストリームの詳細も「×」で閉じる。
こちらも閉じておきます
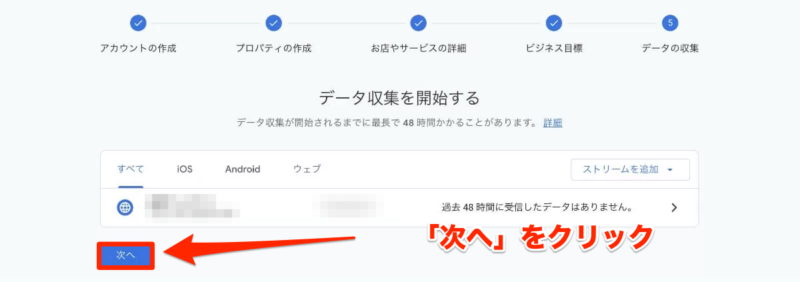
データ収集開始ページに戻るので「次へ」をクリック
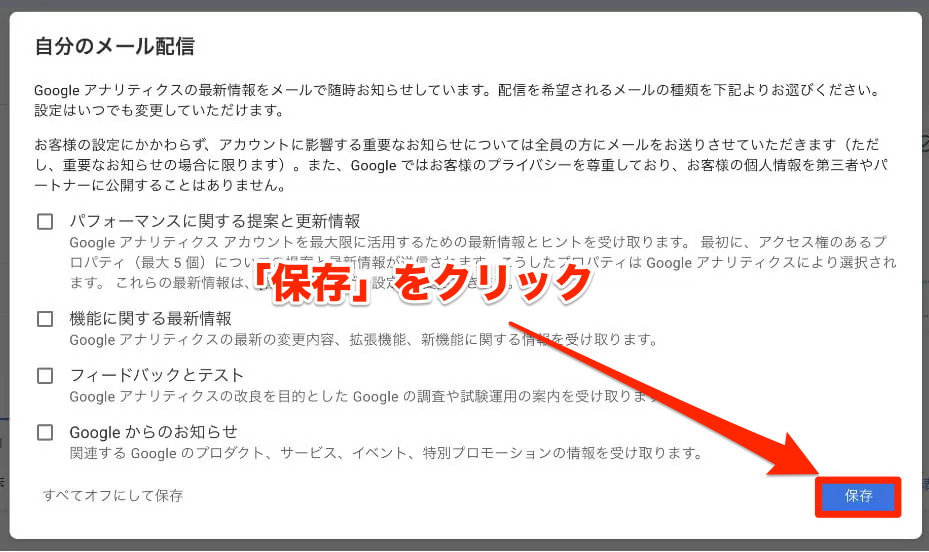
次のページで「ホームに移動」をクリック

メール配信画面で「保存」をクリック
 まさる
まさるホーム画面が表示されたら「ブログの登録」は完了です!
測定IDをWordPressに設置する
測定IDをWordPressに入力して、計測できるようにしていきます。
まさる次の流れで設置しますよ!
- 測定IDを確認する
- SEO SIMPLE PACKにコピペする
まずは測定IDを確認していきます。
Googleアナリティクスの左メニューから「管理」→「データストリーム」をクリック
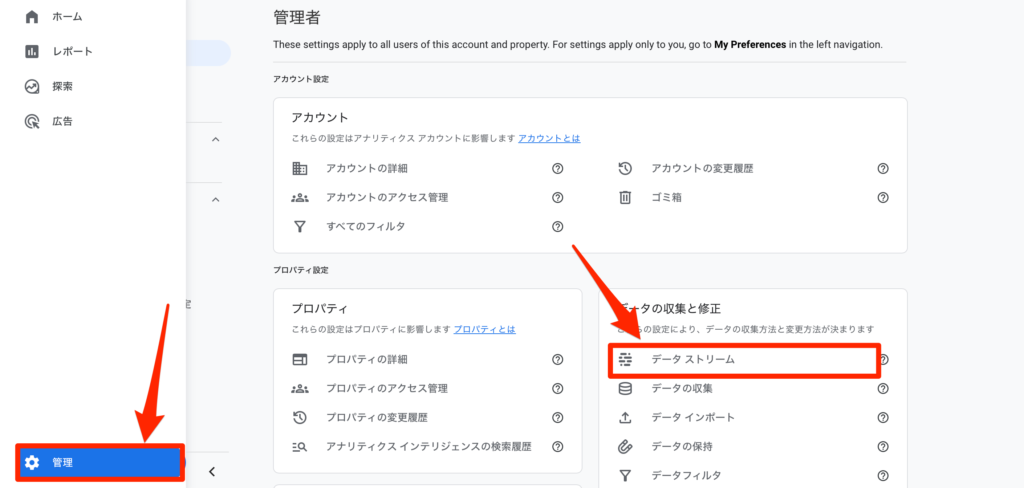
自分のブログをクリックする
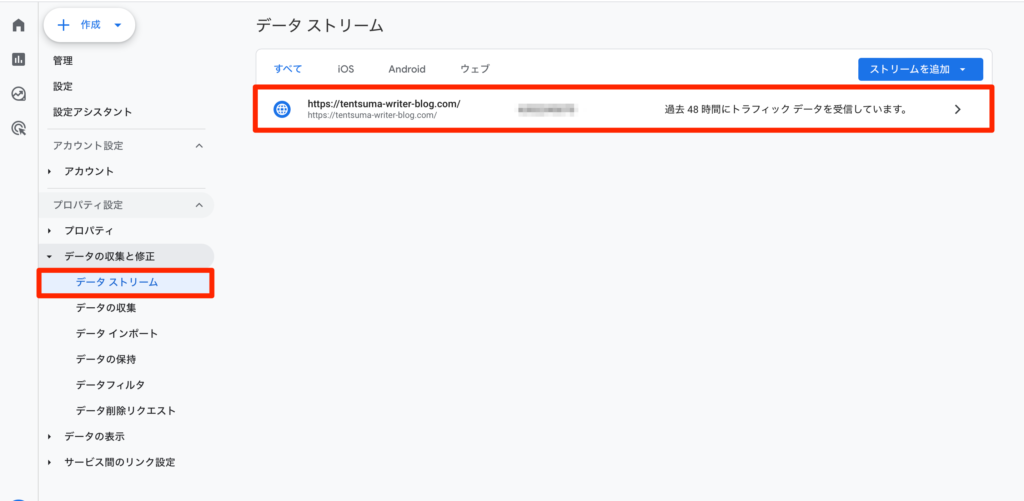
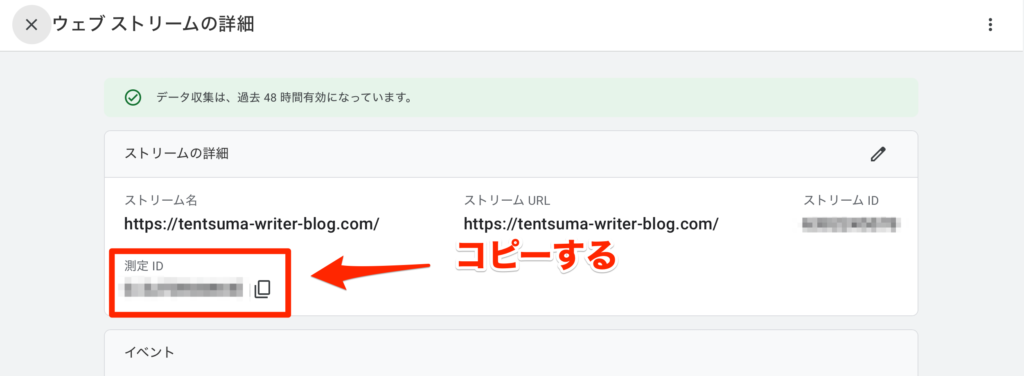
測定IDが表示されるのでコピーする
 まさる
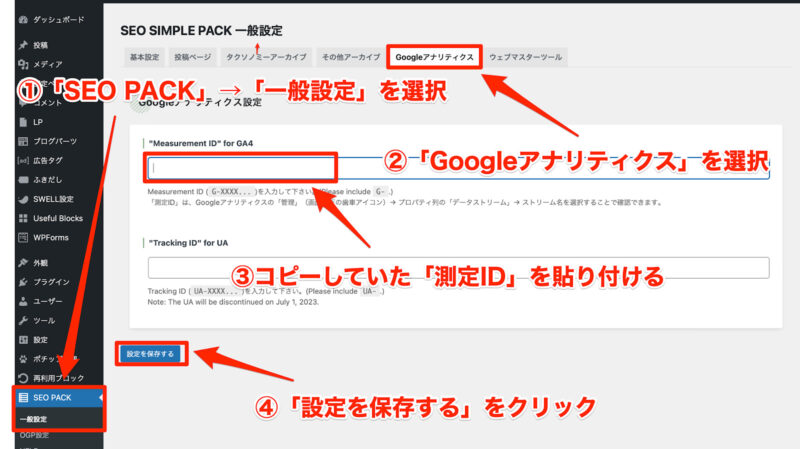
まさる下記の流れで測定IDを設置していきます。
- 「SEO PACK」→「一般設定」を開く
- 「Googleアナリティクス」のタブを選択する
- コピーしておいた「測定ID」を貼り付ける
- 忘れずに「設定を保存する」をクリックする
 まさる
まさる以上でGoogleアナリティクスを設定できました!
Googleアナリティクスが設定できているか確認する2つの方法
転妻はりー手順どおりにやったけど、上手く設定できているのかしら?
まさる次の2つの方法で確認できますよ!
- ステータスから確認する
- リアルタイムレポートから確認する
ステータスから確認する
1つ目はGoogleアナリティクスのステータス情報から確認する方法です。
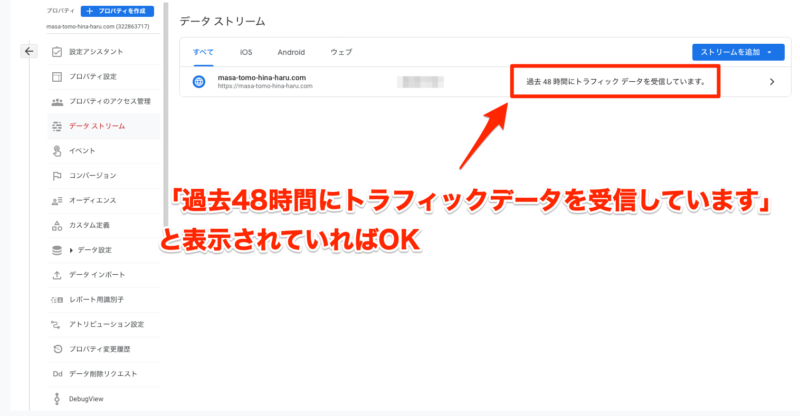
転妻はりーGoogleアナリティクスの管理画面を開いて、プロパティの「データストリーム」をクリックします。
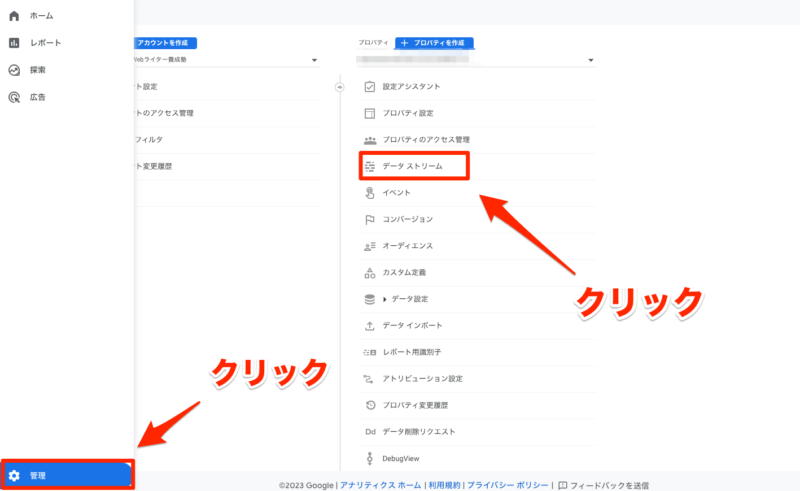 転妻はりー
転妻はりー「過去48時間にトラフィックデータを受信しています」と表示されていれば大丈夫です。
リアルタイムレポートから確認する
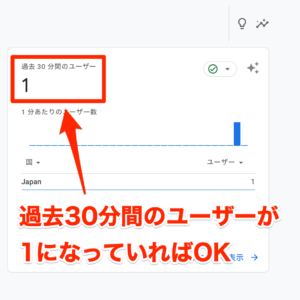
転妻はりーGoogleアナリティクスのリアルタイムレポートからも確認できます
スマートフォンなどで自分のブログにアクセスしておきます。
- アナリティクス左側メニューの「レポート」をクリック
- 「リアルタイム」をクリックして「過去30分間のユーザー」が増えているか確認
 まさる
まさる以上2つの方法で確認するようにしてくださいね
Googleアナリティクスで設定するべき項目
まさるGoogleアナリティクスを設置したら、次の3つを最適な設定にしておきましょう。
- イベントデータの保存期間の延長(2ヶ月→14ヶ月へ)
- Googleシグナルの有効化設定(同一アカウントからの訪問を単一にする)
- IPアドレス除外設定(自宅からのアクセス除外)
イベントデータの保存期間の延長(2ヶ月→14ヶ月へ)
まさる次の手順通りに設定し直して「14ヶ月」に変更しておきましょう。
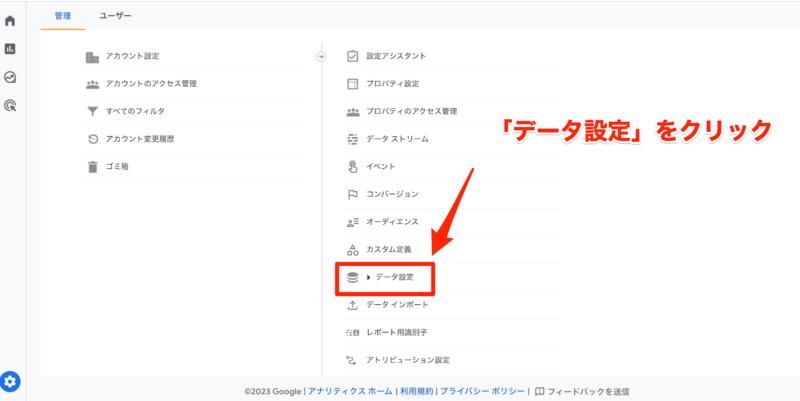
まさるまずはGoogleアナリティクスを開きます
「管理」→「プロパティ」→「データ設定」
データ設定→「データ保持」
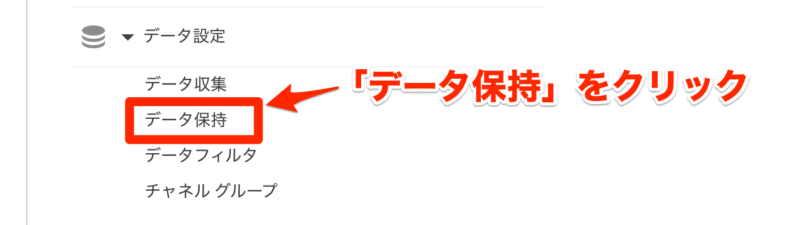
イベントデータの保持期間を「14ヶ月」に変更
 まさる
まさる最後は忘れずに「保存」をクリックしましょう
Googleシグナルの有効化設定(同一アカウントからの訪問を単一にする)
まさるなんのこっちゃ?って感じですよね。
簡単にまとめると
って感じです。
現代人はパソコンやスマートフォン、タブレットなど様々な端末でブログを見ます。
まさるGoogleシグナルを有効にしておけば正確なデータが取れるようになるります。
忘れずに設定しておきましょう。
Googleシグナルを有効にする方法
- 「データ収集」をクリック
- 「設定」をクリック
- 「続行」をクリック
- 「有効」をクリック
- 赤枠の部分がオンになっていれば完了
「データ収集」をクリック→「設定」をクリック
アナリティクスのメニュー「管理」から「データ収集」をクリック
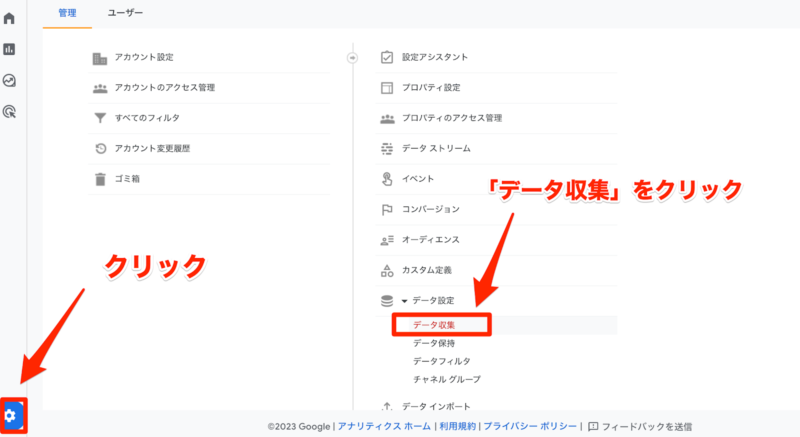
「設定」をクリック
赤枠内の「設定」をクリック

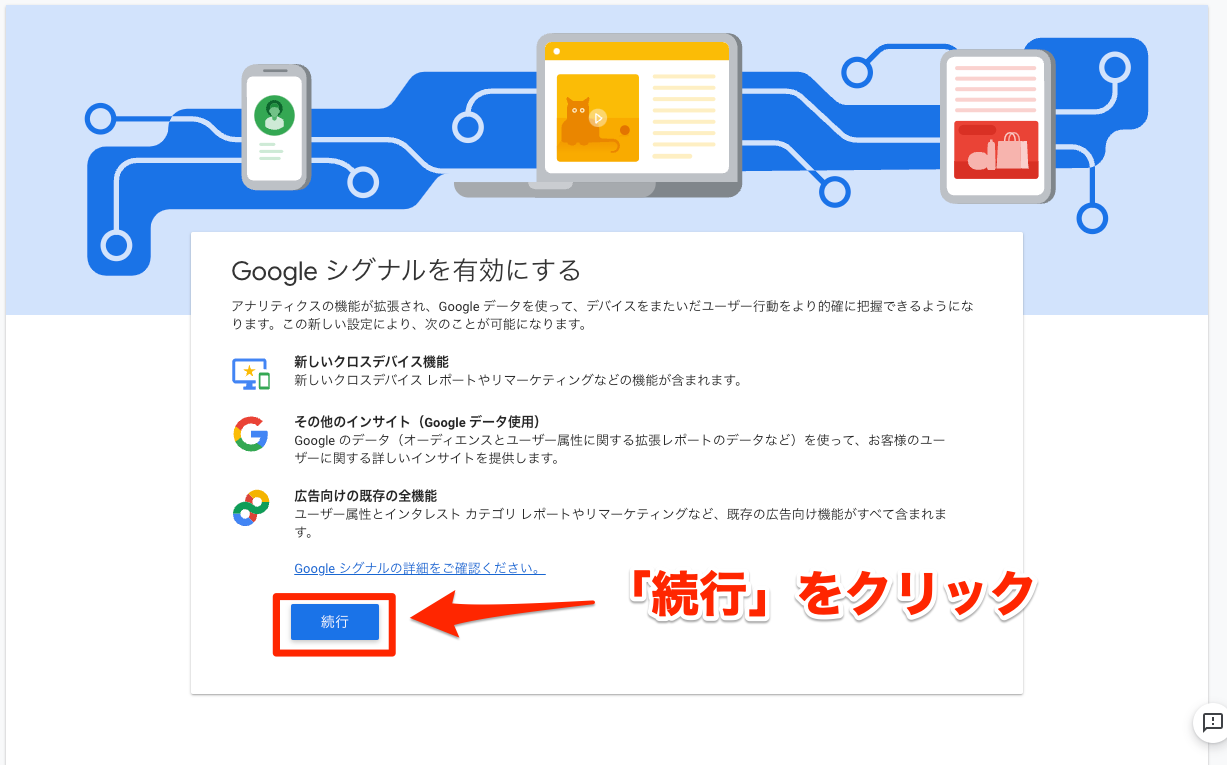
「続行」をクリック
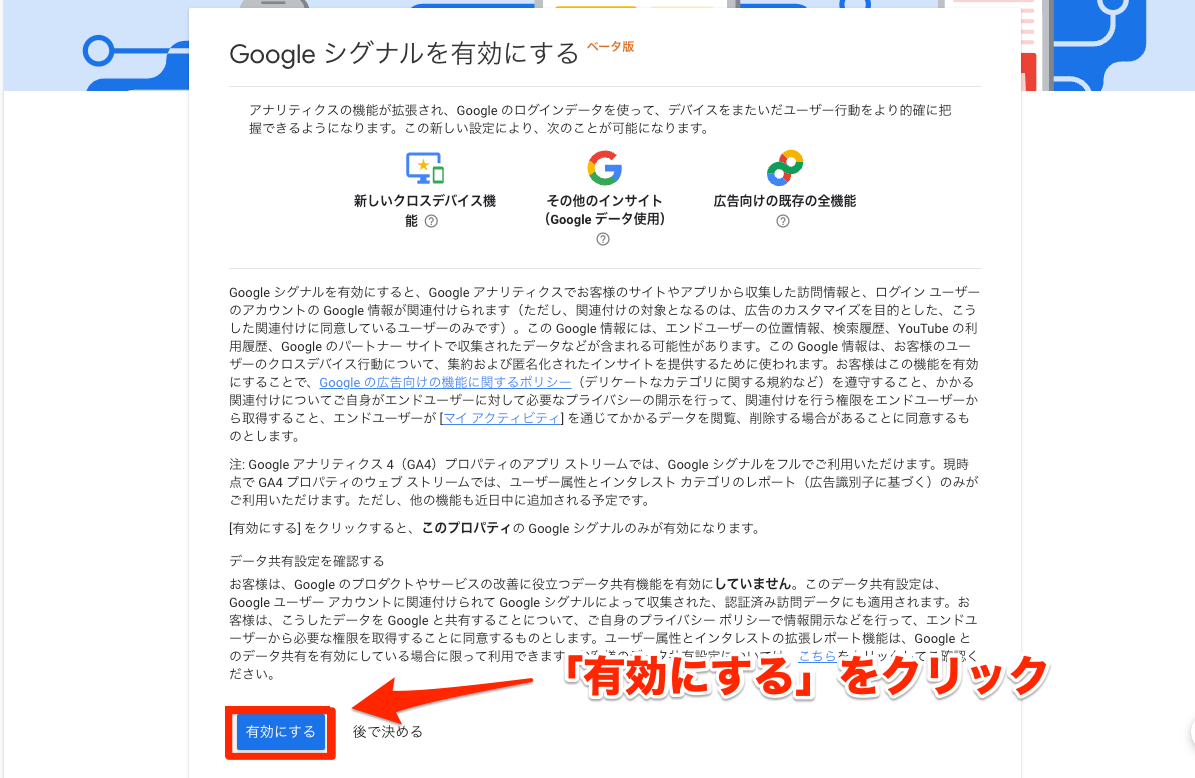
「有効にする」をクリック
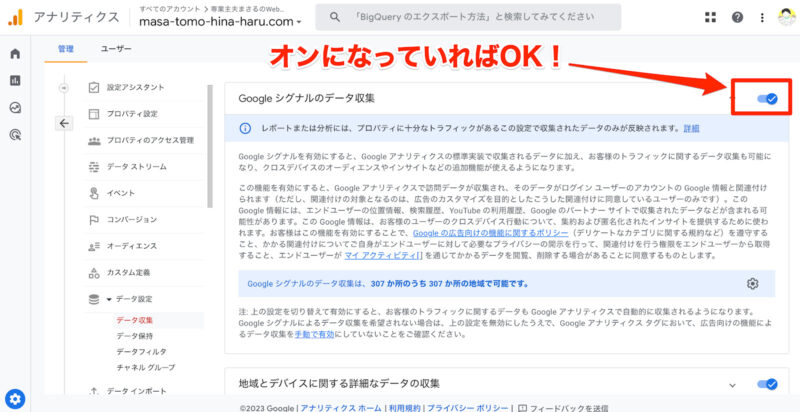
赤枠の部分がオンになっていれば完了
転妻はりー赤枠の部分がオンになっていれば設定完了です!
IPアドレス除外設定(自宅からのアクセス除外)
訪問したユーザー数やPV数に、自分のアクセスが含まれていると正確な分析ができません。
転妻はりー特定のIPアドレスを除外する設定をして、データから自分のアクセスを除けるようにしましょう
下記の方法で設定
- IPアドレスの確認
- IPアドレスの除外設定
- 除外設定のテスト
- 除外設定の有効化
IPアドレスの確認
転妻はりーまずは自分のIPアドレスを確認しましょう。
\ 外部サイトに飛びます/
上記ボタンをクリックすれば下記のような画面が表示されます。
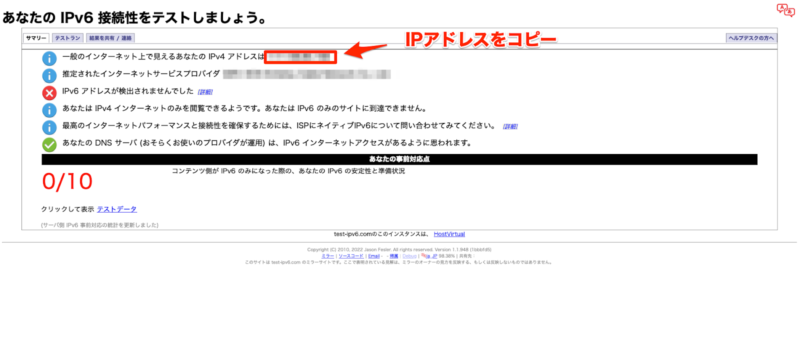 まさる
まさるコピーの方が楽ちんですよ!
IPv4とIPv6の違いについて
まさるもしIPv6でアクセスしているのであれば、IPv6のアドレスをコピーして使用します
IPアドレスの除外設定
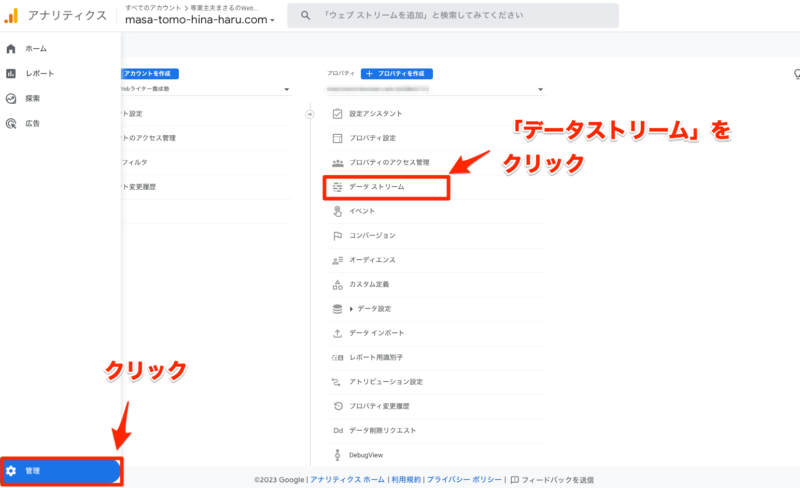
まさるアナリティクスの管理画面を表示します。
メニュー左下の歯車「管理」を選択して「データストリーム」をクリック
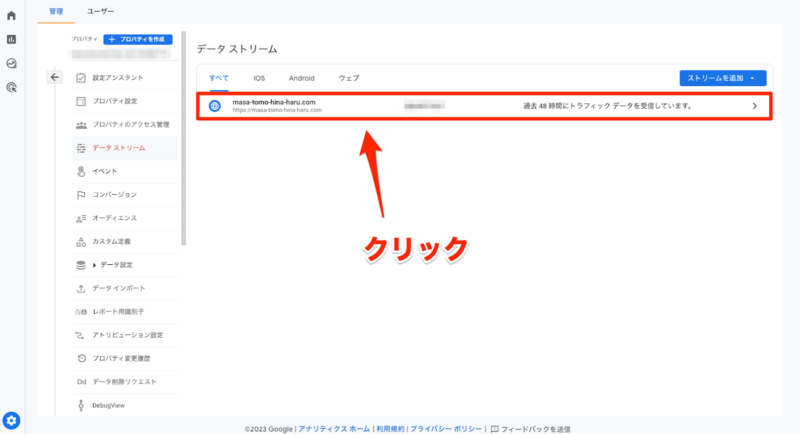
自分のブログのデータストリームをクリック
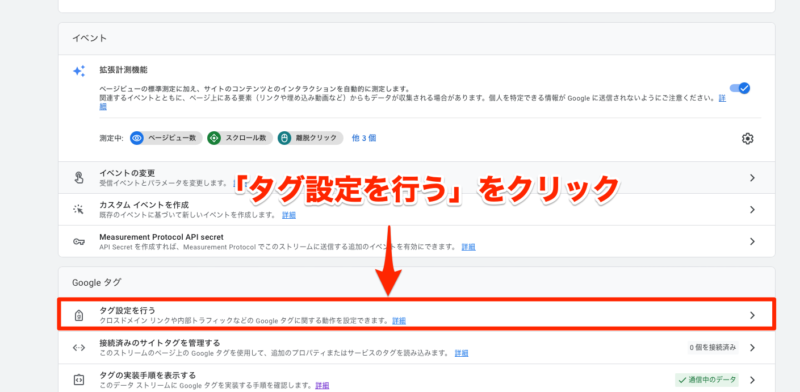
「タグ設定を行う」をクリック
表示が少ない場合は「Show more」をクリック
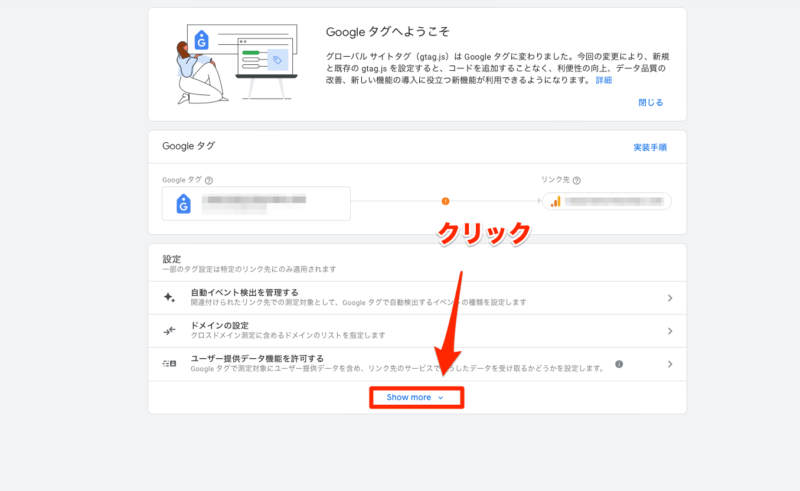
「内部トラフィックの定義」をクリック
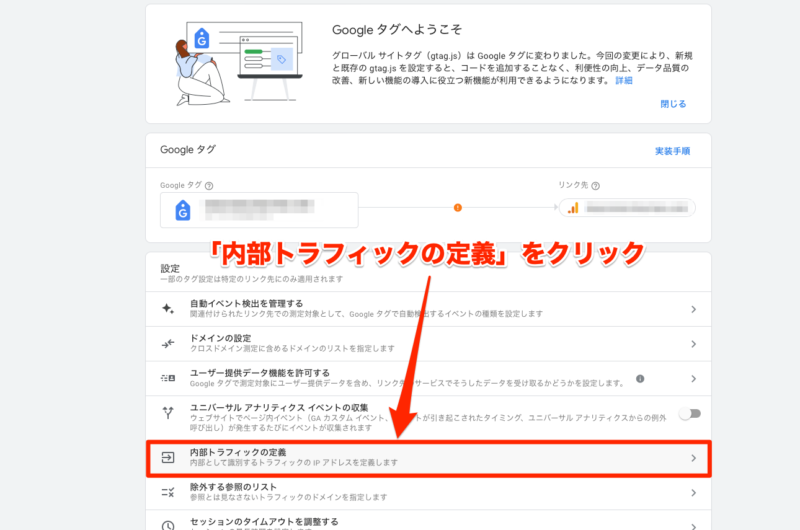
「作成」をクリックして新たにルールを追加
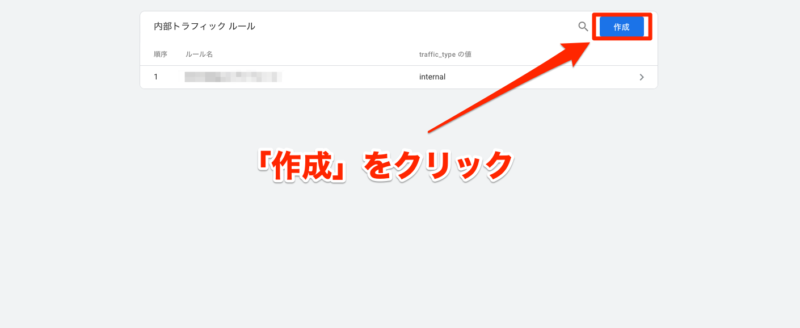
必要な情報を入力して「作成」をクリック
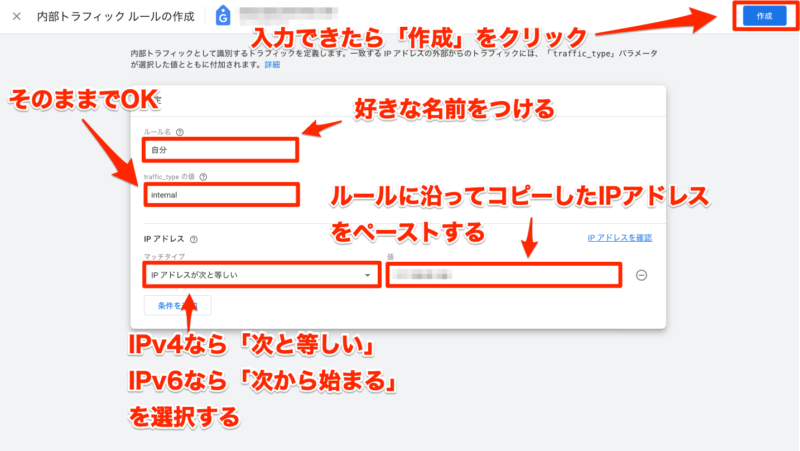
| 入力箇所 | 入力内容 |
|---|---|
| ルール名 | 任意のルール名を入力 |
| traffic_typeの値 | デフォルトのまま(internal)で問題なし |
| マッチタイプ | IPv4の場合:「IPアドレスが次と等しい」を選択 IPv6の場合:「IPアドレスが次から始まる」を選択 |
| 値 | IPv4の場合:IPアドレスをすべて入力 IPv6の場合:コロン区切りの4ブロックまでを入力 例:「0000:00:000:00aa:00aa:00aa:00aa:0aa0」なら「0000:00:000:00aa」 |
まさる全て入力できたら「作成」をクリックして完了です!
以上で新しい内部トラフィックのルールが追加されました。
除外設定のテスト
転妻はりー実際に除外設定ができているかテストしていきましょう!
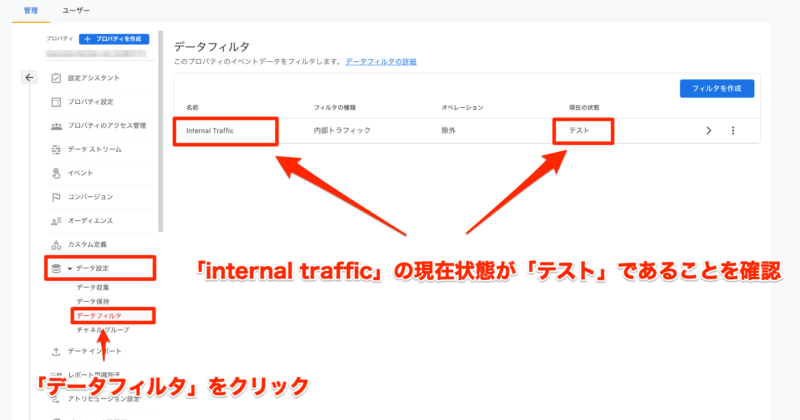
「データ設定」→「データフィルタ」をクリック「internal traffic」が「テスト」状態か確認
転妻はりーまずはGoogleアナリティクスの管理画面を開きます
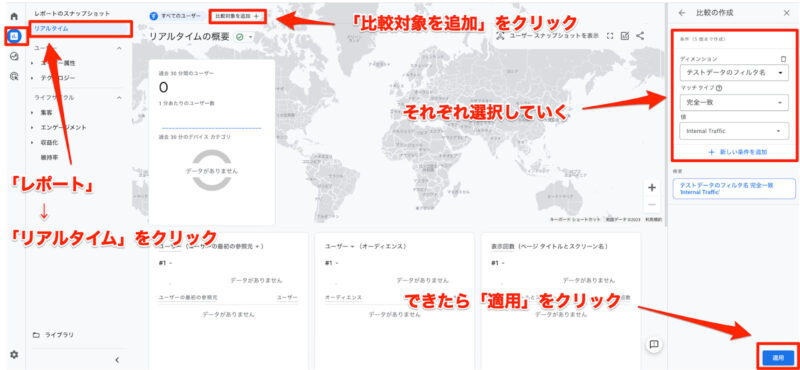
Googleアナリティクスのリアルタイムで比較対象を追加する
- 管理画面メニューから「レポート」 →「リアルタイム」を選ぶ
- 「比較対象を追加」をクリック
- 必要情報を選択していく
| 項目 | 入力内容 |
|---|---|
| ディメンション | テストデータのフィルタ名 |
| マッチタイプ | 完全一致 |
| 値 | internal traffic(設定が反映されていないと選べないで待ちます) |
- 選択できれば「適用」をクリック
ブログにアクセスして反映されているか確認
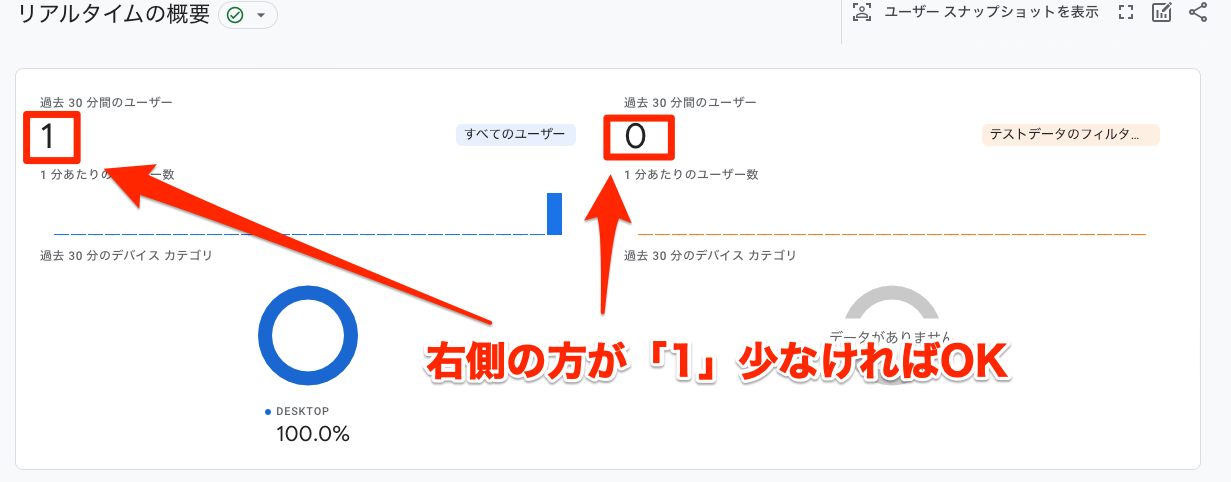 まさる
まさるフィルタ側が1少なければ成功です!
除外設定の有効化
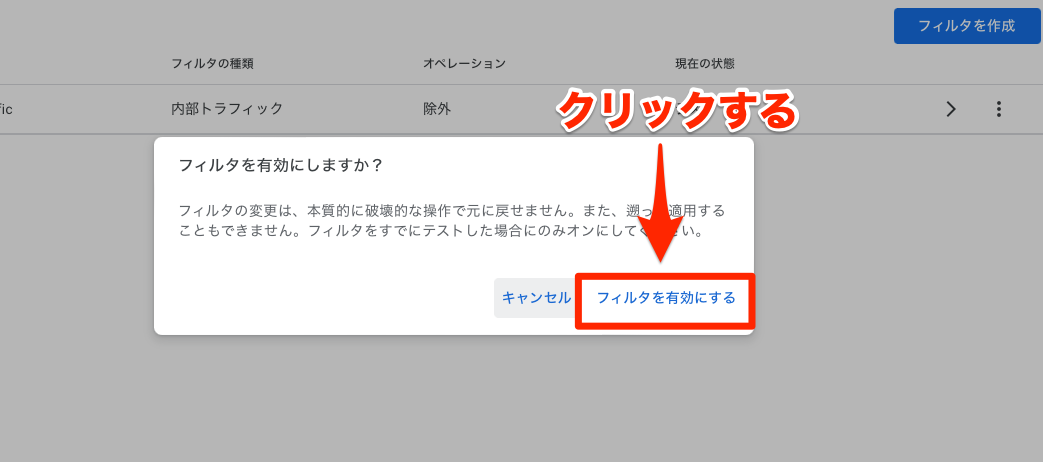
まさるテストした設定を有効化させれば設定完了です。
「データフィルタ」の3点アイコンをクリックして「フィルタを有効にする」を選択
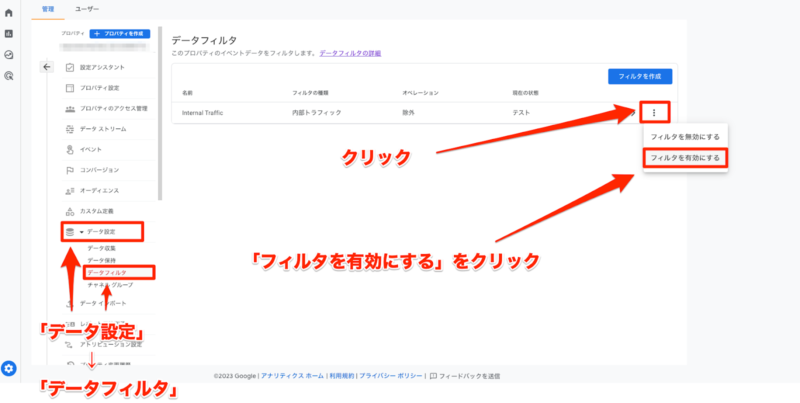
ポップアップ画面が表示されたら「フィルタを有効にする」を選択して完了
 まさる
まさる現在の状態が「テスト」から「有効」に変わっているか確認してくださいね。
Googleサーチコンソールを導入して連携する
「Googleサーチコンソール」は、サイトへの流入キーワードなどがわかるGoogle公式の分析ツールです。
まさる無料で使えるので、絶対に導入しておきましょう。
下記の記事で導入方法を詳しく解説しています。

GoogleアナリティクスとGoogleサーチコンソールを連携させる1番のメリットは、1つの画面で分析ができることです。
まさるサーチコンソールの導入が完了している人は、Googleアナリティクスと連携させていきます。
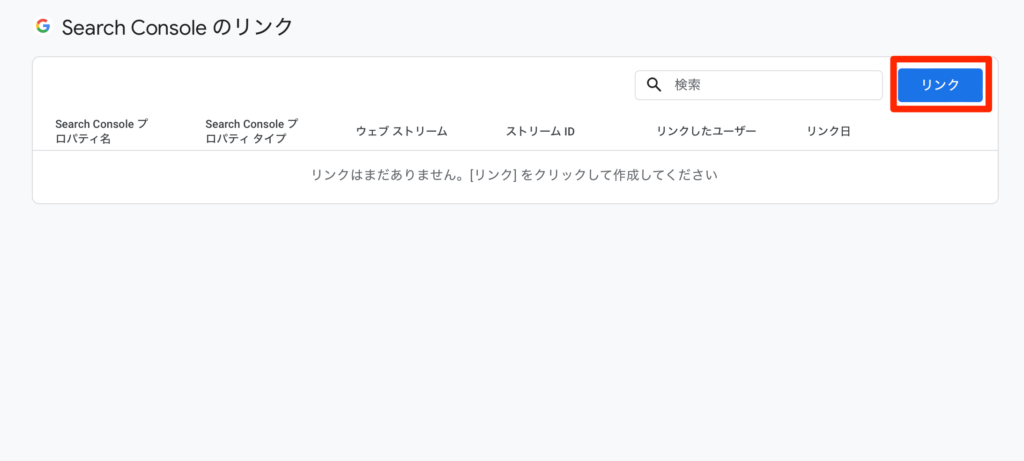
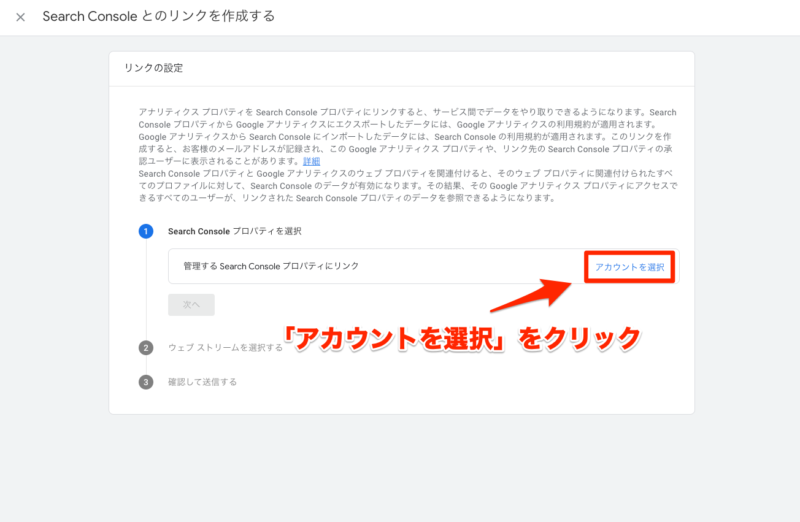
- 「search consoleのリンク」をクリック
- 「アカウントを選択」をクリックします。
- 自分のブログURLにチェックを入れて、「確認」をクリック
- 表示されているURLが正しいか確認して「次へ」クリック
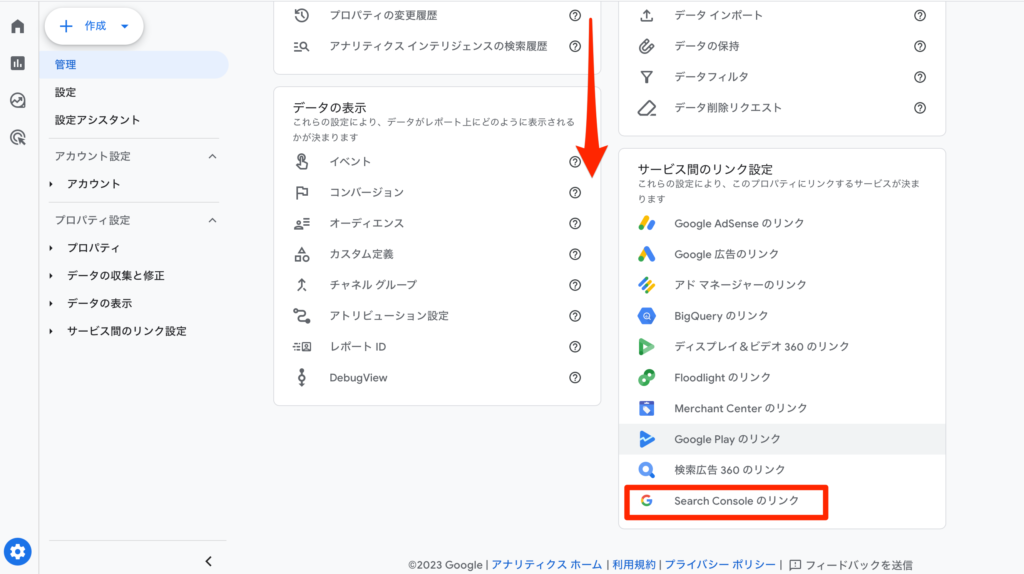
Googleアナリティクスのメニューから管理を選ぶ
下にスクロールして「Search Consoleのリンク」をクリック

「search consoleのリンク」をクリック
「リンク」をクリック
右上の「リンク」をクリックする
「アカウントを選択」をクリックします。
表示されているURLが正しいか確認して「次へ」クリック

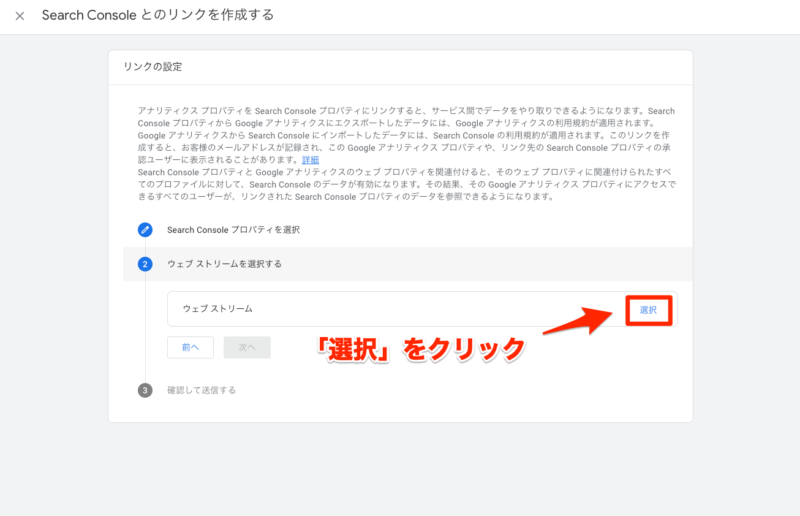
「選択」をクリック
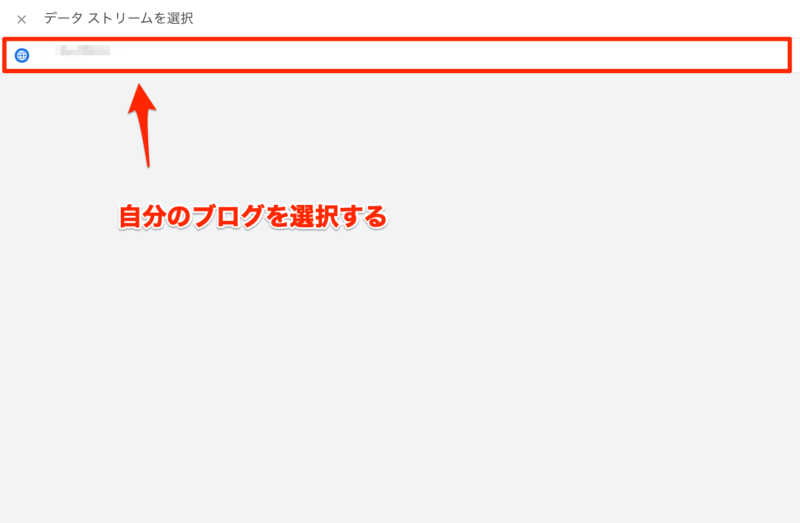
自分のブログを選択
ウェブストリームに表示されているURLが正しいか確認して「次へ」をクリック

サーチコンソールとウェブストリームを確認
問題なければ「送信」をクリック
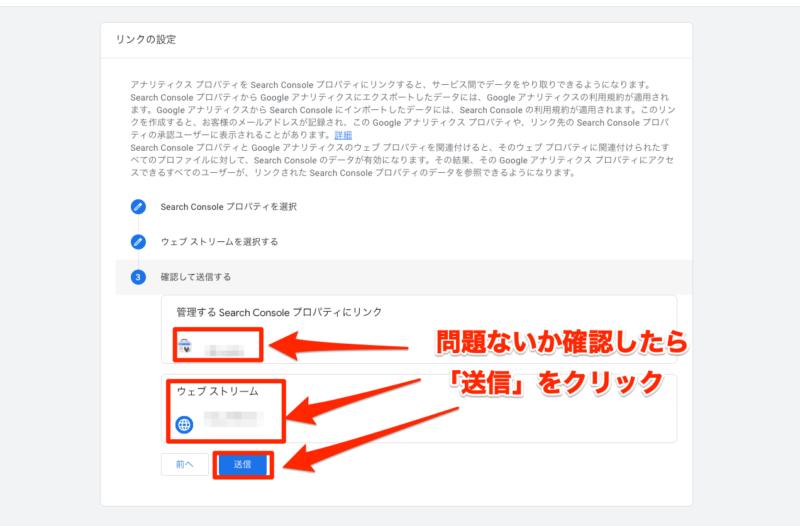
「リンク作成済み」と表示されていれば完了
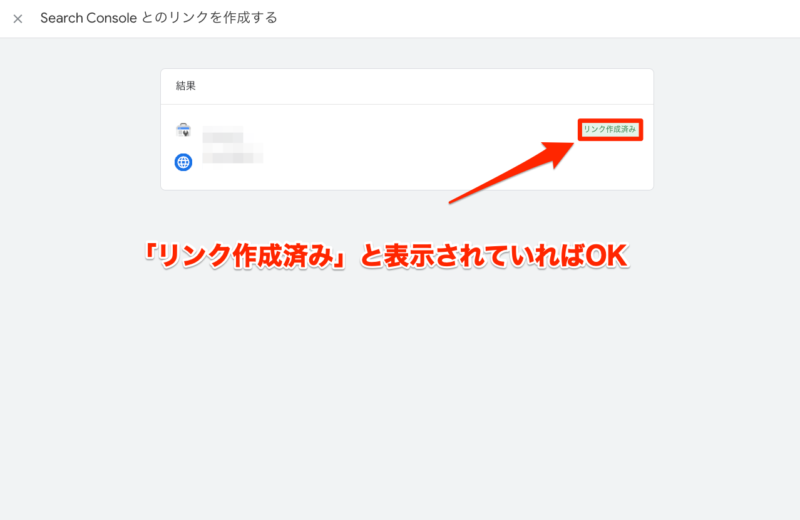 まさる
まさるこれでサーチコンソールとリンクされて便利に使えるようになりましたよ
Googleアナリティクスでよくある質問10選
Googleアナリティクスは無料ですか?
まさる無料で利用できる優良ツールです。
ブログ運営に必須なので、この記事を参考に導入しましょう。
まさるGoogleサーチコンソールも導入してくださいね
UAとGA4の違いは?
一言でまとめると、分析対象が違います。
まさるUAは「セッション」GA4は「ユーザー」に重きを置いています。
できることにも違いがありますが、タブレットやスマホなど様々な端末でアクセスする現代では、ユーザー単位で分析することが求められます。
以前のUAでは別端末でアクセスしていると、別人としてカウントされていました。
まさるUAのサポートはもう終了しているので、GA4を使いこなせるようになりましょう。
UAのサポートはいつまで?
2023年7月1日に終了しています。
まさるデータは1年間確認できるみたいですよ
【Google公式】[UA] ユニバーサル アナリティクスは Google アナリティクス 4 に置き換わりました
これから導入する人はGA4に対応している記事を参考にしてくださいね。
GA4に移行しないとどうなる?
まさる2023年7月1日よりデータが取得できなくなっています
GA4に移行して分析できるようにしておきましょう。
SWELLでGA4のタグ設置方法はいくつありますか?
まさる3つあります
GA4のタグ設置する3つの方法
- プラグインの「SEO SIMPLE PACK」を利用する方法
- カスタマイズの「高度な設定」を利用する方法
- テーマの「ファイルエディター」を利用する方法(非推奨)
まさる「SEO SIMPLE PACK」を使う方法が1番シンプルで簡単なのでこの記事で紹介していますよ
SEO SIMPLE PACKってなに?
まさるWordPressプラグインです。
SWELLに必須のプラグインになっているので必ず導入しましょう。
まさるSWELLにオススメのプラグインはこちらの記事で紹介しているので参考にしてください。

SWELLの高度な設定でタグ設置がエラーになります
まさるレンタルサーバーが原因みたいです。
SWELLを使うなら「SEO SIMPLE PACK」は必須です。
まさるSEO SIMPLE PACKで設定してくださいね。
タグを設置しても計測できません
まさる次の3つが原因と考えられます。
タグを設置しても計測できない理由3選
- タグの設置位置が間違っている
- 設置したタグが間違っている
- WordPressかSWELLの不具合(SWELLのフォーラムで確認してみましょう)
Googleサーチコンソールは入れるべき?
GoogleアナリティクスとGoogleサーチコンソールは分析対象が全く違います。
まさるどんなキーワードでサイトに訪れているのかを見たいなら、Googleサーチコンソールは必須です。
SWELL以外でも同じ方法で導入できますか?
Googleアナリティクスでの操作は同じですが、WordPress側の操作はテーマによって異なります。
まさる「自分のテーマ名 アナリティクス」で検索してみてくださいね
まとめ
この記事ではSWELLでGoogleアナリティクスを設定する方法を紹介してきました。
Googleアナリティクスを設定すれば、読者のブログ内での動きが分かるようになります。
まさる魅力的なブログにするために、分析を怠らないようにしましょう!
Googleアナリティクスの設定が終われば、次はGoogleサーチコンソールの設定を行いましょう。
まさるこの記事で、Googleアナリティクスの設定が完璧にできていれば5分もかからずに設定できますよ!

コメント