

 転妻はりー
転妻はりーWordPressブログを開設したら、お問い合わせフォームを作成しよう?
 転妻はりー
転妻はりーあれもこれも作れって・・・正直めんどくさいわ!
 転妻はりー
転妻はりー難しそうだし・・・後回しにしちゃお!
 まさる
まさる今すぐ作ってください!
 転妻はりー
転妻はりー急に出てくるわね!びっくりするじゃない
 まさる
まさるお問い合わせフォームを作っておかないと困ったことが起きますよ?
困ってしまうこと
- 読者が質問や要望を伝えたくても届かない
- 読者とコミュニケーションが取れない
- ブログのコンテンツやデザインを改善する読者からのヒントが得られない
- 読者が不満を持ってブログを訪れなくなる
転妻はりーそれは困るわ!
でも作るのめんどくさそうだし・・・
 まさる
まさる大丈夫です!
「Contact Form by WPForms」を使えば、誰でも10分でステキなお問い合わせフォームが作れます!
この記事を読めば
- 直感的操作でカンタンにお問い合わせフォームを作成できる
- お問い合わせフォームをトップページに掲載する方法がわかる
- スパムメッサージが届かなくなる
 まさる
まさる有名なお問い合わせフォーム作成プライグインには次の2種類あります。
- Contact Form by WPForms
- Contact Form 7
まさるContact Form 7の方が有名ですが、SWELL開発者の了氏はContact Form by WPForms推しです。
Contact Form by WPForms
シンプルなコンタクトフォームが超簡単に設置できるプラグイン。
推奨プラグインと非推奨・不要・注意すべきプラグインについて
私はいつも「Contact Form 7」よりこっちを使ってます。
まさる両方使った感想は、圧倒的に「WPForms」の方が使いやすかったです!
この記事では「Contact Form 7」「Contact Form by WPForms」を使ったことがある著者がおすすめする「Contact Form by WPForms」でお問い合わせフォームを作成する方法を紹介します。
転妻はりー難しそう・・・
私なんかができる気がしない
まさる大丈夫!
画像をたくさん使って解説しますよ。
まさる誰でも10分
慣れた人なら5分で作れますよ!

まさる
☆独立系FP×Webライター×ブロガー
- 3歳と2歳の息子を育てながら月10万円以上稼ぐ
- 年間100記事以上執筆
- 10記事以上で検索上位に表示
☆保有資格
- 1級ファイナンシャル・プランニング技能士(FP1級)
- 全日本SEO協会SEO検定1級
- 宅地建物取引士
- 日商簿記2級
\ 詳しいプロフィールはこちら /
「Contact Form by WPForms」をインストール・有効化する
まさるまずは2ステップでインストールして、有効化していきます!
- プラグイン追加画面で検索する
- インストール・有効化する
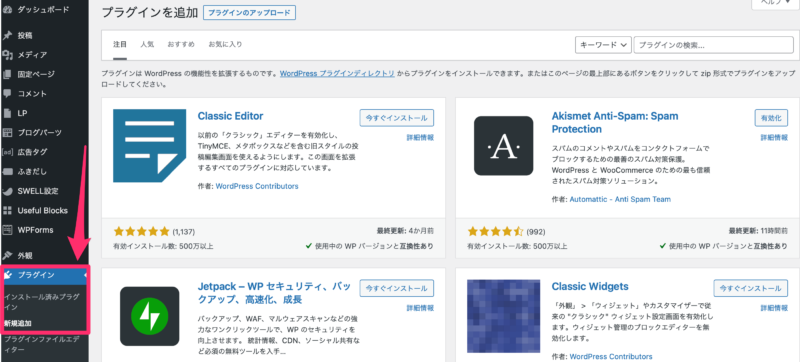
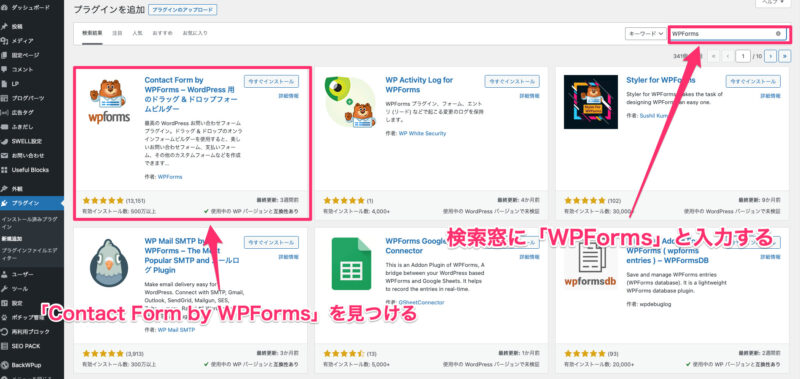
プラグイン追加画面で検索する
プラグイン追加画面を開きます。
検索窓に「WPForms 」と入力して、Contact Form by WPFormsを見つけます。
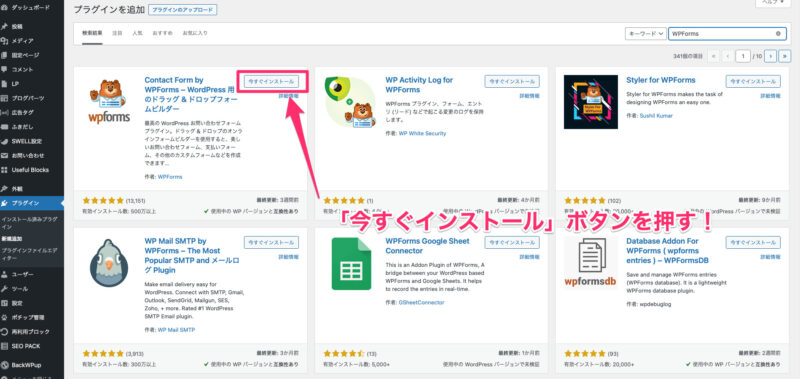
インストール・有効化する
「今すぐインストール」ボタンを押す。
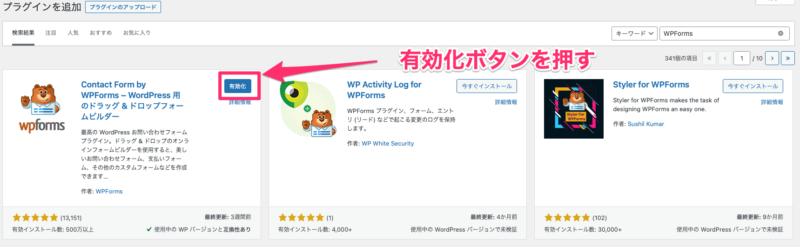
インストールできれば「有効化」に変わるので押す。
 まさる
まさるこれでContact Form by WPFormsのインストール、有効化は完了です。
「Contact Form by WPForms」でお問い合わせフォームを編集する
まさる次の5ステップで自分好みに編集していきましょう!
- 【共通】WPFormsを「新規追加」する
- 【共通】WPFormsテンプレートを選択する
- フィールドを追加する
- フィールドを自分好みに編集する
- お問い合わせ送信先メールアドレスを変更する
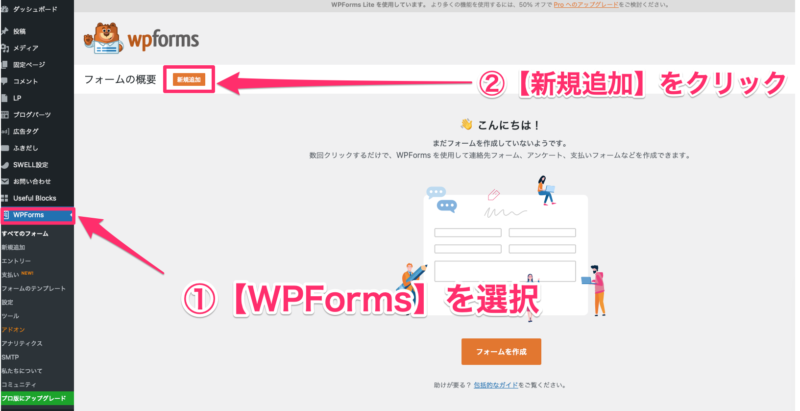
【共通】WPFormsを「新規追加」する
【管理画面】から
- 【WPForms】を選択
- 【新規追加】をクリック
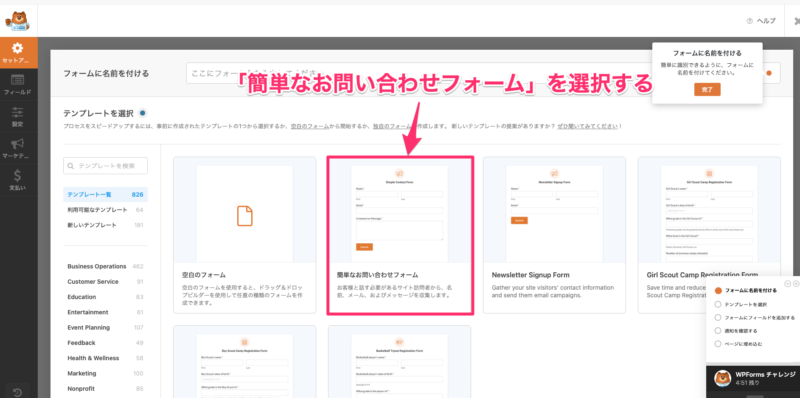
【共通】WPFormsテンプレートを選択する
「簡単なお問い合わせフォーム」を選択する。
 まさる
まさるシンプルなお問い合わせフォームが作成されるので、好みに合わせて編集します。
フィールドの追加・編集で自分好みにカスタマイズできます。
 まさる
まさる考えるのが面倒な人は、ステップ3以降をそのままマネして下さい。
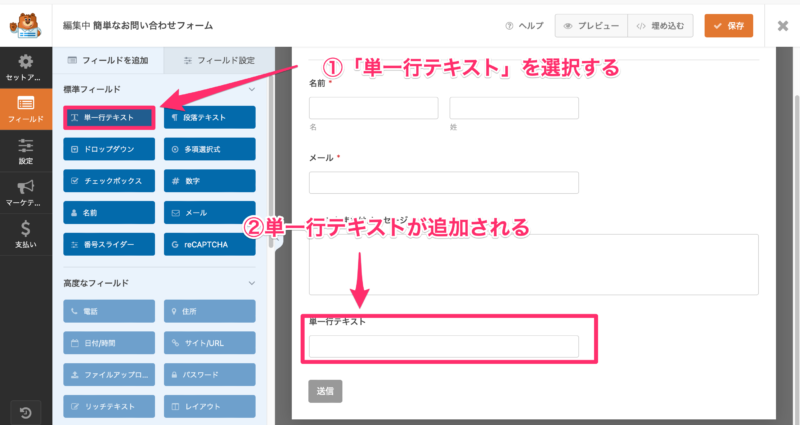
フィールドを追加する
「フィールドを追加」の中から
- 「単一行テキスト」をクリック
- 単一行テキストが追加される
 まさる
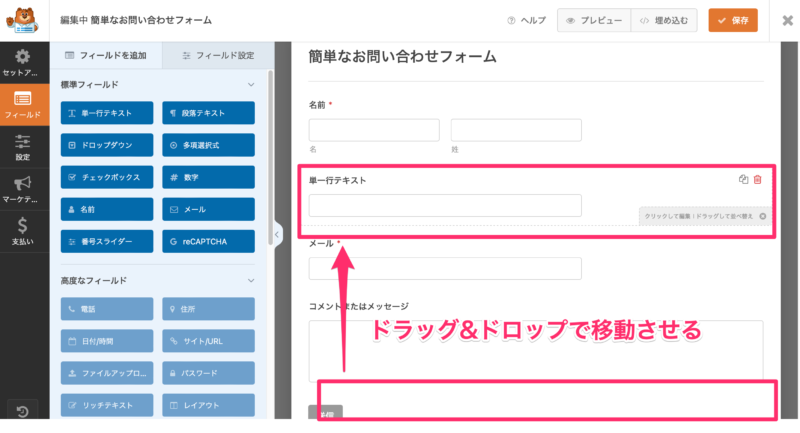
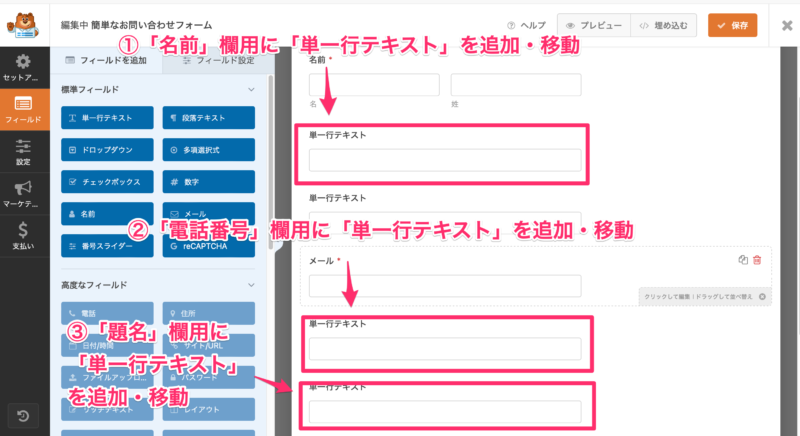
まさる追加した「単一行テキストフィールド」を「フリガナ欄」用として移動させます。
「名前」の下にドラッグ&ドロップで移動させる。
 まさる
まさるマウス操作だけで動かせますよ。
「単一行テキスト」を3つ追加して移動させます。
- 「名前」欄を1つのブロックに変更するために「単一行テキスト」の追加と移動
- 「電話番号」欄用に「単一行テキスト」の追加と移動
- 「題名」欄用に「単一行テキスト」の追加と移動
 まさる
まさるフィールドの追加は完了です!
次はフィールドの内容を編集していきます。
フィールドを自分好みに編集する
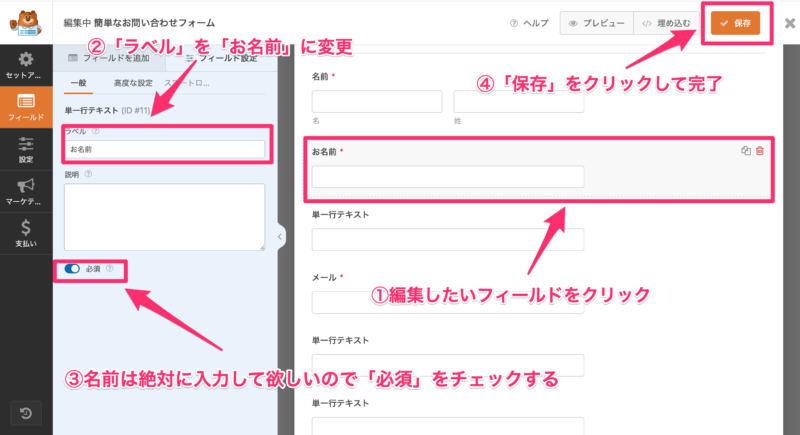
- 編集したいフィールドをクリック(今回はお名前に変更予定の1番上のフィールドを選びます)
- 「ラベル」を「お名前」に変更
- 名前は絶対に入力して欲しいので「必須」をチェックする
- 「保存」をクリックして完了
 まさる
まさる同じ要領で、他のフィールドも編集していきます!
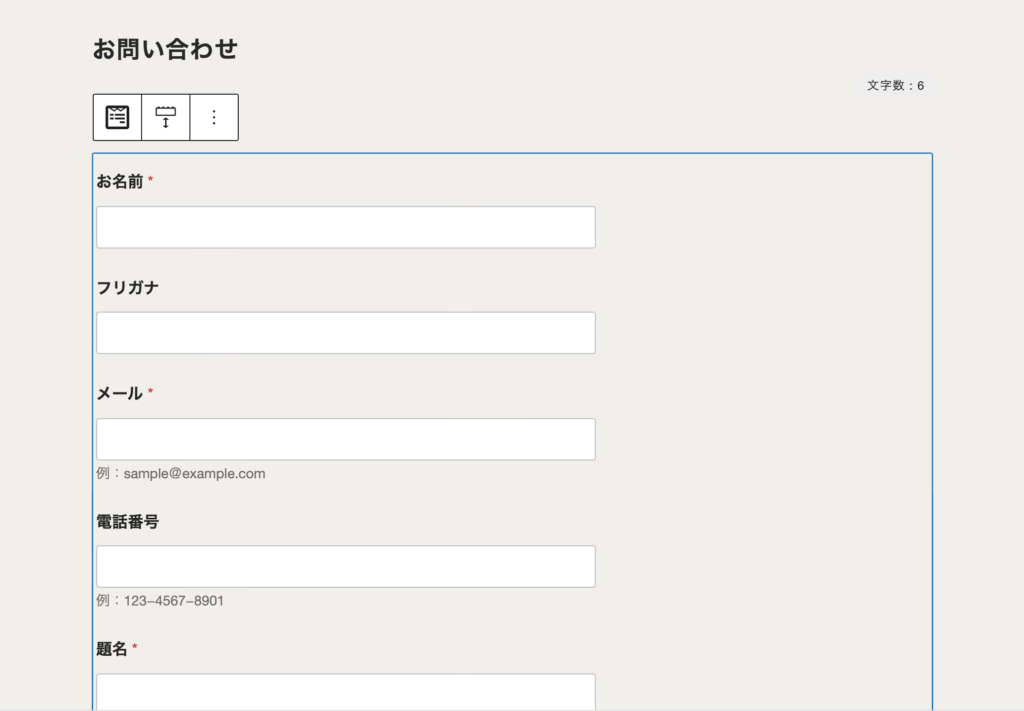
当ブログでは以下の内容に編集しています。
| ラベル | 説明 | 必須設定 |
|---|---|---|
| お名前 | 空欄 | ON |
| フリガナ | 空欄 | OFF |
| メール | 例:sample@example.com | ON |
| 電話番号 | 例:123−4567−8901 | OFF |
| 題名 | 例:〇〇について | ON |
| 内容 | 空欄 | ON |
まさる考えるのが面倒な人は、上記の表をコピーしてマネしちゃいましょう!
まさる自分好みのお問い合わせフォームに変更して下さいね。
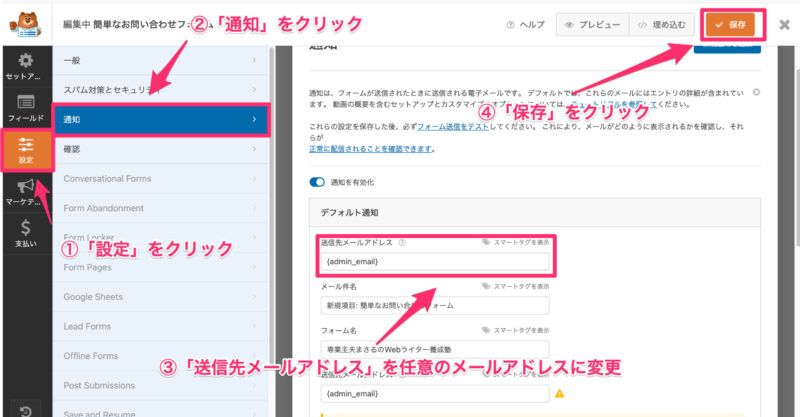
お問い合わせ送信先メールアドレスを変更する
まさる普段使っているメールアドレスの方が便利です。
違う場合は変更しておきましょう。
- 「設定」をクリック
- 「通知」をクリック
- 「送信先メールアドレス」を任意のメールアドレスに変更
- 「保存」をクリック
 まさる
まさるこれで、お問い合わせフォームの作成は完成です。
「WPFormsお問い合わせフォーム」をブログに設置する
まさるお問い合わせフォームを作成したらブログに設置します!
転妻はりーカンタンにできる?
まさる3ステップでできますよ!
- 固定ページを新規作成して「お問い合わせフォーム」を埋め込む
- フッターメニューを作成する
- メニュー項目に追加する
まさるお問い合わせページは「フッター」に設置するのがオススメです!
フッターとは…?
Webサイトの下部に配置された領域で、サイトの運営者情報や連絡先、プライバシーポリシー、免責事項、その他ユーザーが必要な情報が設置されています。
まさるこの記事ではフッターに設置する方法を紹介しますね。
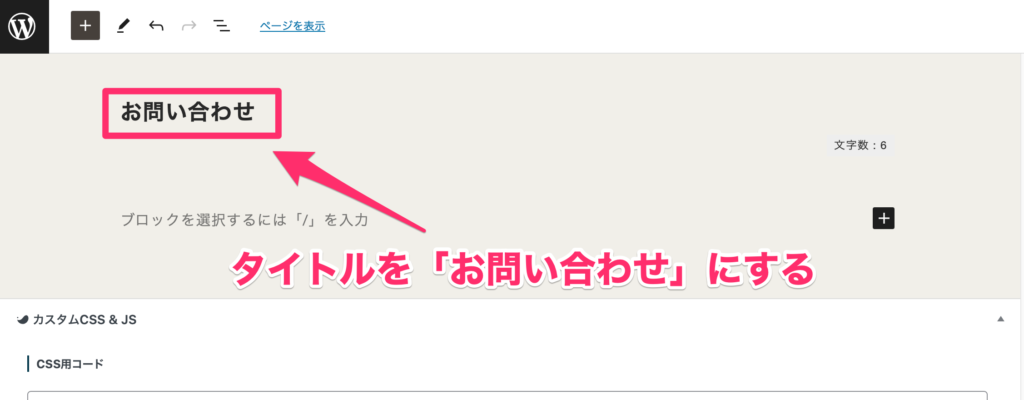
WordPressの管理画面から固定ページ新規追加を選びます。
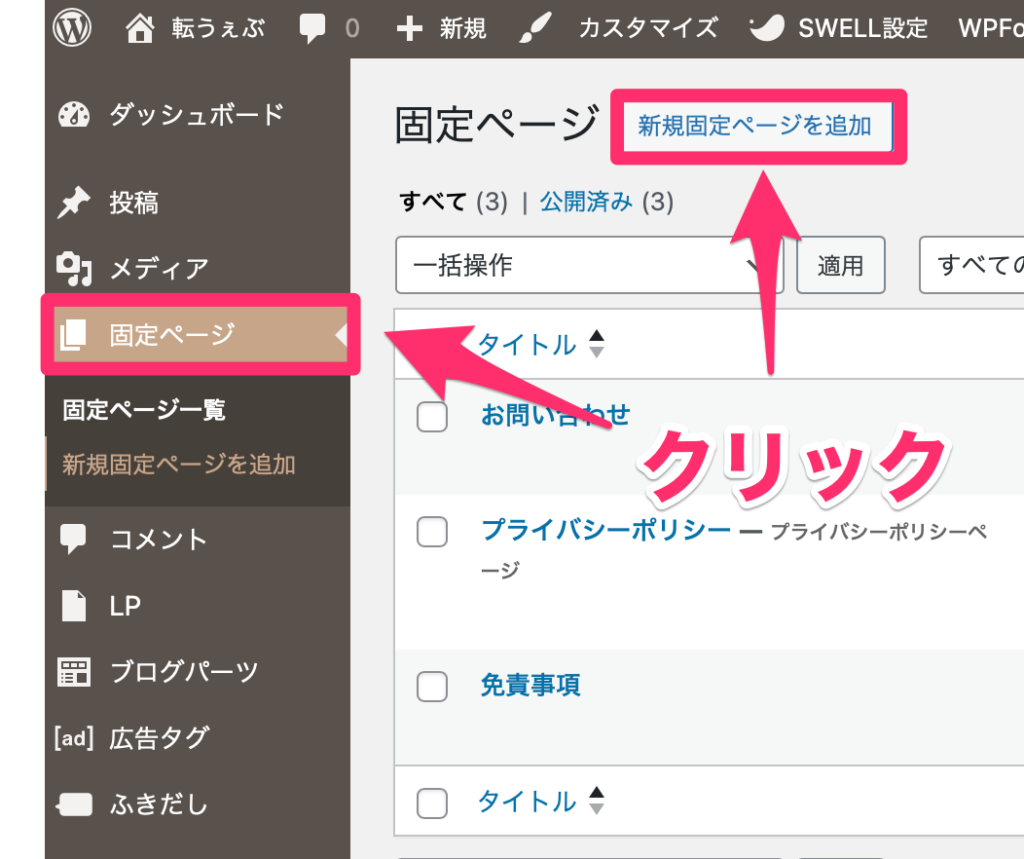
新しくできた固定ページのタイトルを「お問い合わせ」にする。
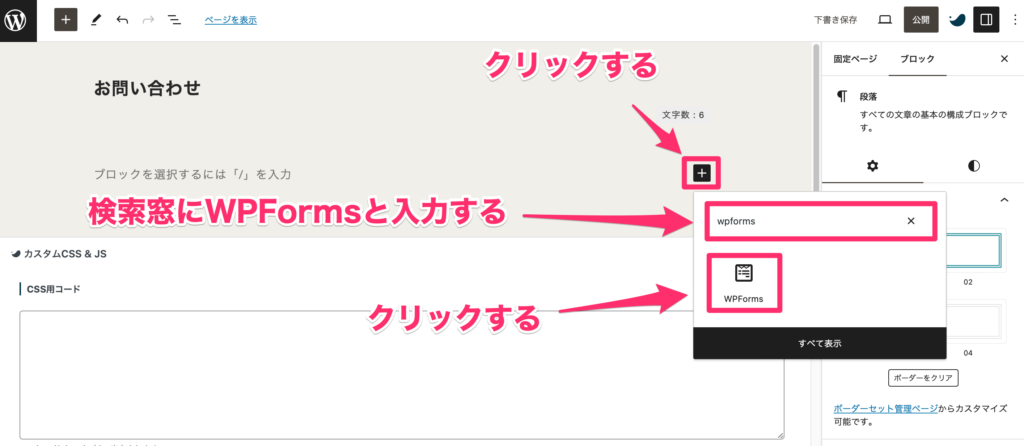
ブロックを追加するの+ボタンからContact Form by WPFormsを選ぶ。
設定したお問い合わせフォームをクリックします。
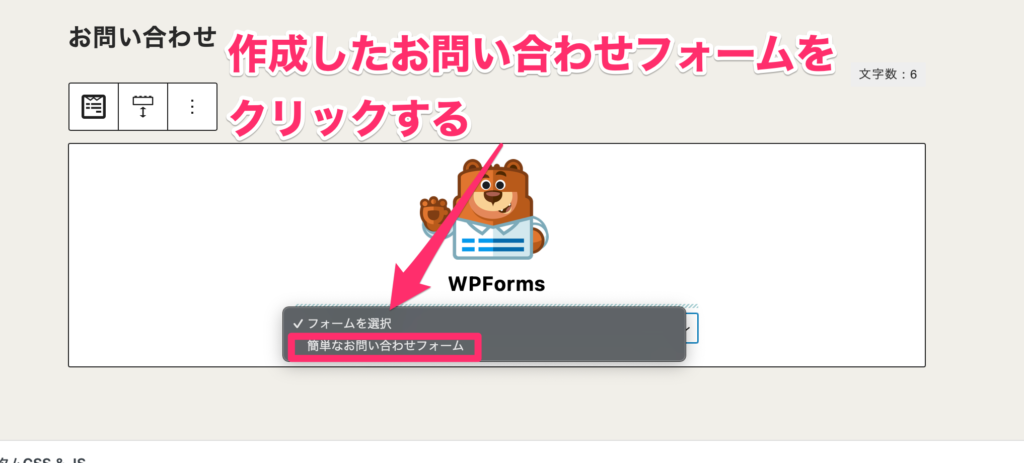
作成していたお問い合わせフォームが表示されます。
 まさる
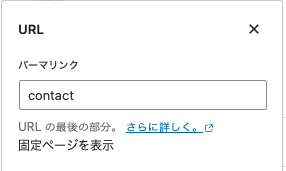
まさるパーマリンクはcontactなどに変更しておきましょう。
 まさる
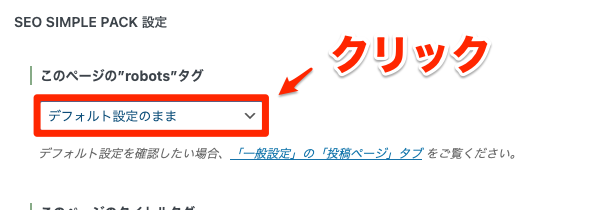
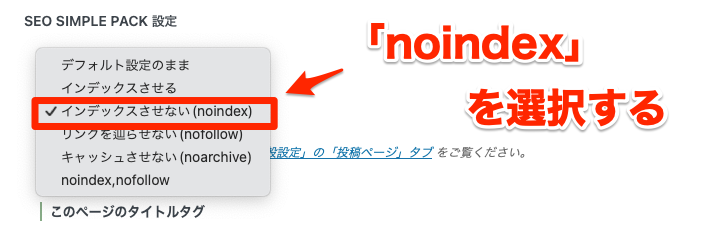
まさる下にスクロールして「インデックスさせない(noindex)」に設定しておきます。
 まさる
まさる最後に画面右上の「公開」ボタンを押せば、お問い合わせページの完成です。
まさる作成したお問い合わせページをサイト内へ設置していきます。
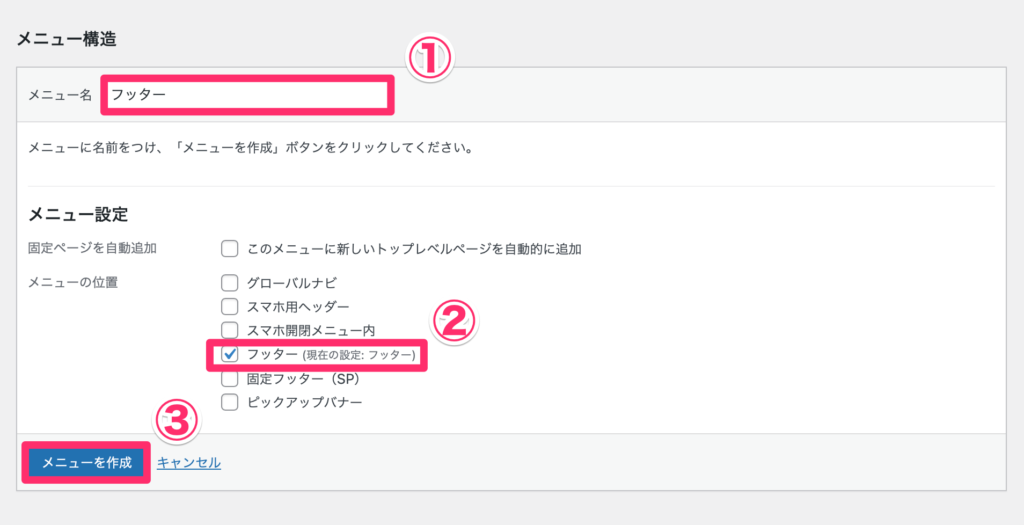
- 【外観】→【メニュー】をクリック
- 「新しいメニューを作成しましょう」をクリック
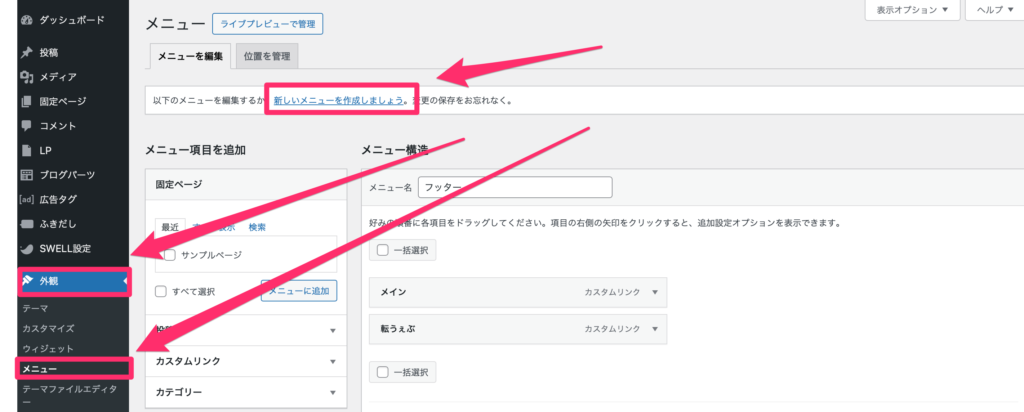
- メニュー名に「フッター」と入力
- フッターに「✔︎」を入れる
- 「メニューを作成」をクリック
まだメニューを1つも作っていない人は下のような画面になります。
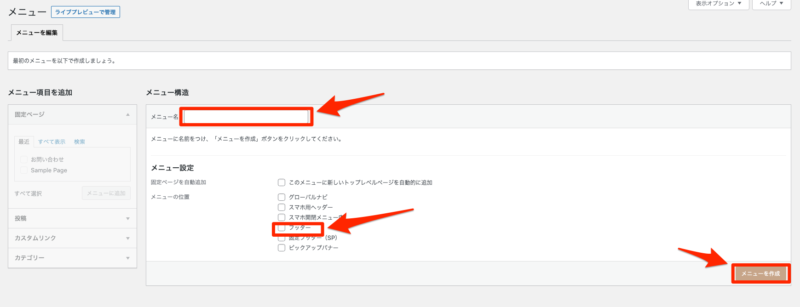 まさる
まさる同じようにフッターを作成して下さいね。
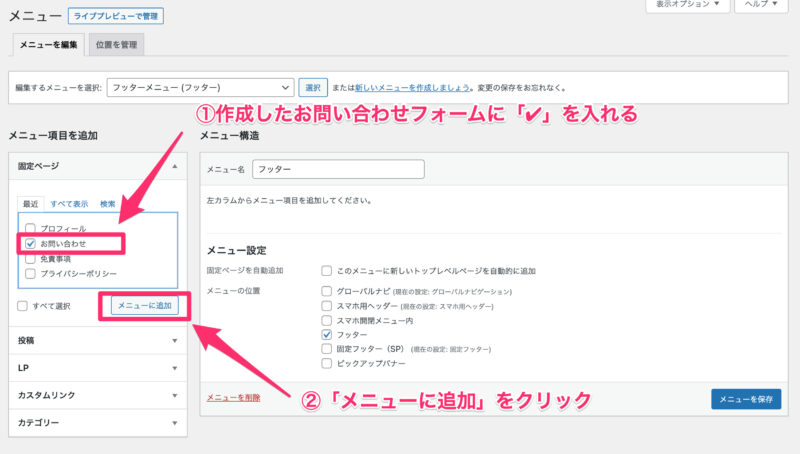
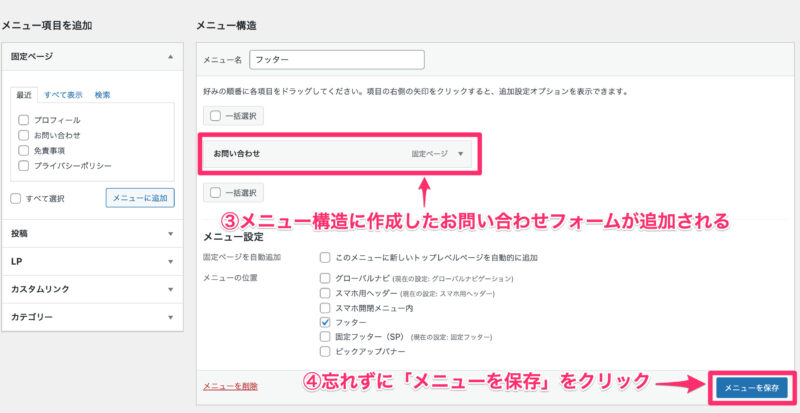
- 作成したお問い合わせフォームに「✔︎」を入れる
- 「メニューに追加」をクリック
- メニュー構造に作成したお問い合わせフォームが追加される
- 忘れずに「メニューを保存」をクリック
 まさる
まさるフッターにお問い合わせフォームが表示されるようになりましたよ。
 転妻はりー
転妻はりー5分くらいでできたわ!
まさる新しくメニューを作成すれば、メニューの位置を好みの場所に設置できますよ!
スパム対策で「reCAPTCHA(リキャプチャ)」を導入する
まさるスパム対策のため「reCAPTCHA」を導入していきましょう!
転妻はりースパムってなにかしら?
まさるスパムとは、不特定多数の受信者に無差別に送信されるメッセージのことです。
スパム対策をしていないと、無数のメッセージが送られてきます。
まさるreCAPTCHAを導入すれば激減するので、一緒にやっていきましょう!
- reCAPTCHA(リキャプチャ)の設定
- Contact Form by WPFormsとreCAPTCHAを連動させる
reCAPTCHA(リキャプチャ)の設定
まさるreCAPTCHAを次の4ステップで設定していきます。
- Googleアカウントにログインする
- reCAPTCHAを開く
- reCAPTCHAの設定を行う
- 表示されたサイトキーとシークレットキーをコピーする
Googleアカウントにログインする
reCAPTCHAを使用するためにはGoogleへのログインが必要です。
まさるいつも使用しているGoogleアカウントでログインしてくださいね。
reCAPTCHAを開く
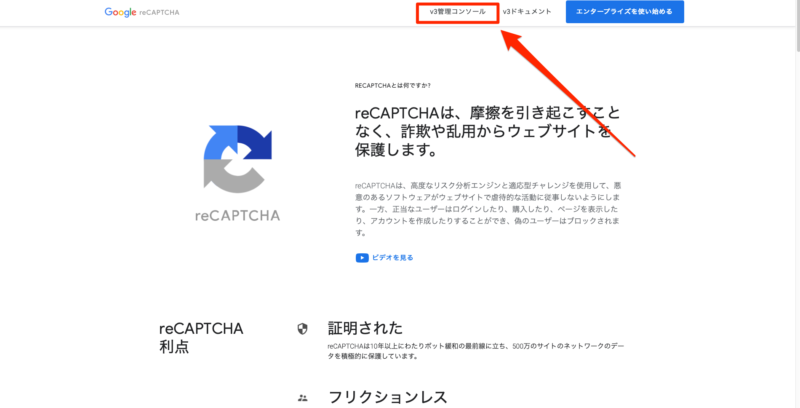
GoogleアカウントにログインしたらreCAPTCHAのトップページを開きます。
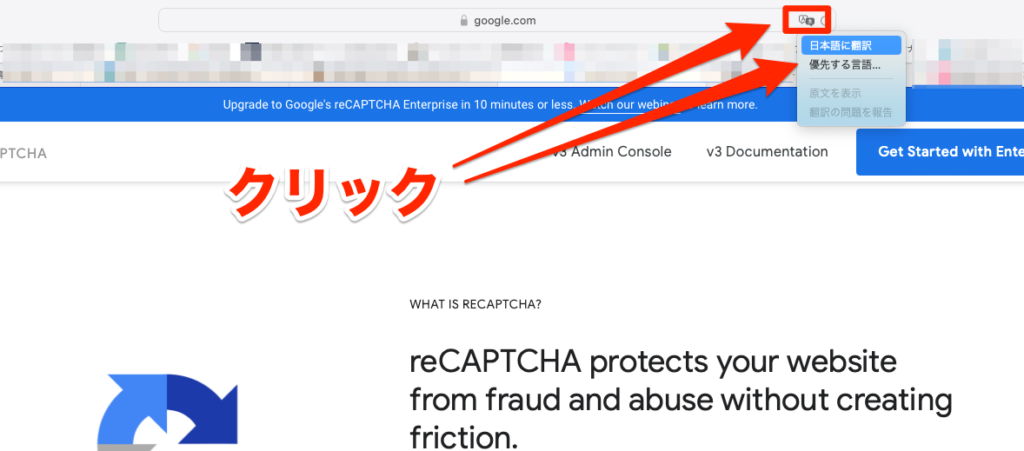
「v3管理コンソール」をクリックして設定に移ります。
reCAPTCHAの設定を行う
右上の+をクリックして自分のブログを登録します。

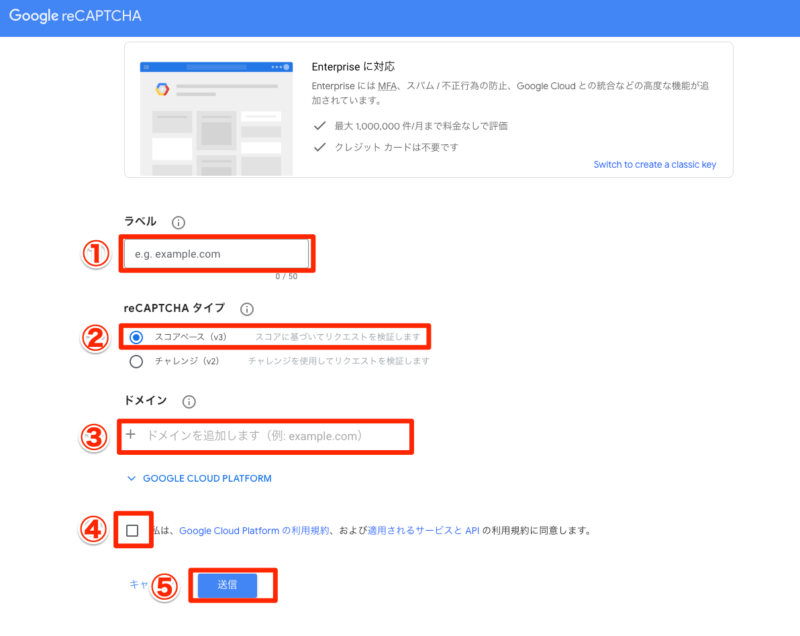
| 項目 | 内容 |
|---|---|
| ①ラベル | サイトのURLやブログ名を入力 |
| ②reCAPTCHAタイプ | v3を選択(デフォルトでは設定) |
| ③ドメイン | 下線部を入力 例)https://◯◯◯◯◯◯◯.com/ |
| ④利用規約 | チェックを入れる |
| ⑤送信 | クリックする |
表示されたサイトキーとシークレットキーをコピーする
まさる登録できれば、連動するためのキーが表示されるので①・②をクリックしてコピーします。
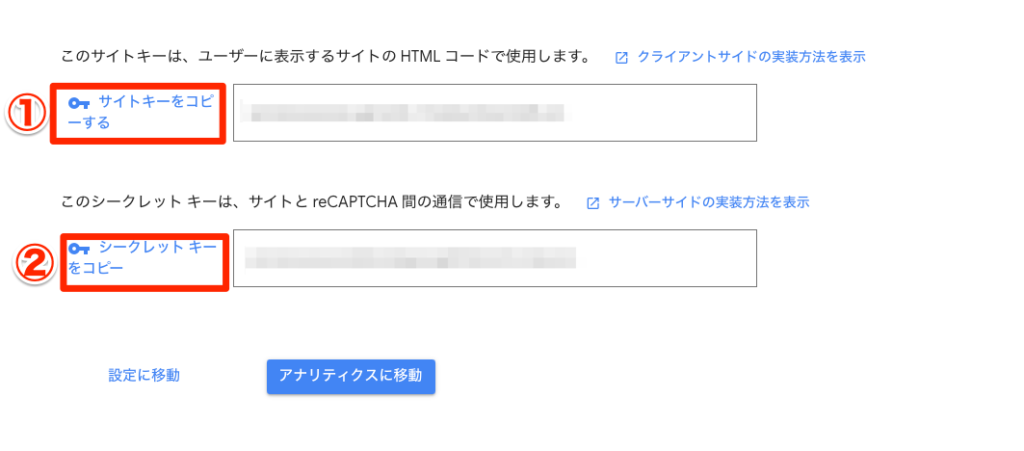 まさる
まさる間違ってページを閉じないようにして下さい。
これで設定完了です。
Contact Form by WPFormsとreCAPTCHAを連携させる
まさるreCAPTCHAを設定したら、次の3ステップでお問い合わせフォームと連携させます。
- WordPress管理画面からWPFormsを開く
- コピーしたキーを入力する
- reCAPTCHAをフィールドに追加する
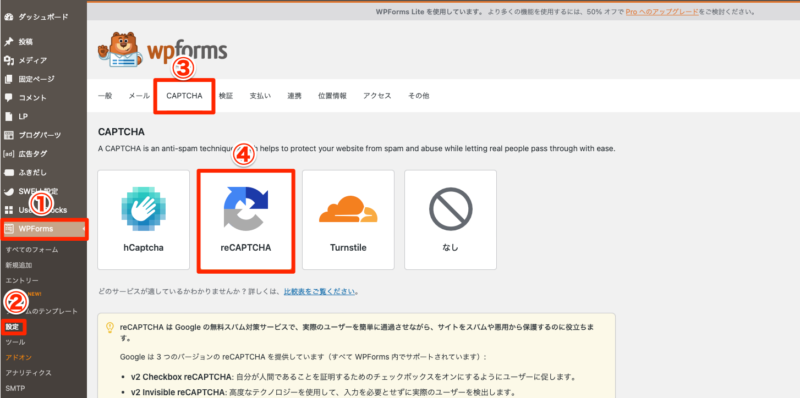
WordPress管理画面からWPFormsを開く
WordPressの管理画面からContact Form by WPFormsを開いてreCAPTCHAを選びます。
- WPFortms
- 設定
- CAPTCHA
- reCAPTCHA
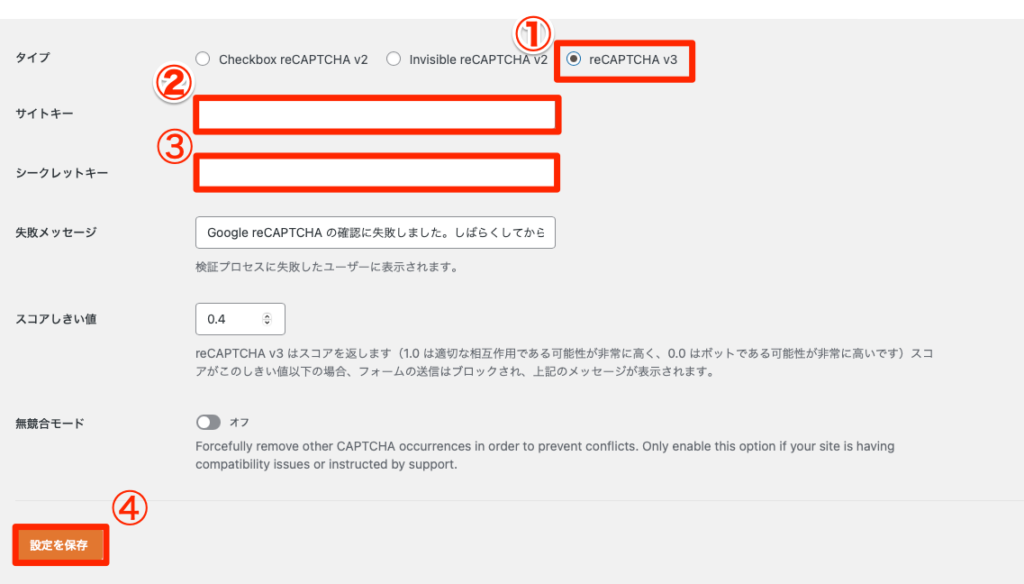
コピーしたキーを入力する
下にスクロールしていくと下記のような画面になるので、入力していきます。
- reCAPTCHA v3を選択する
- コピーしたサイトキーをペーストする
- コピーしたシークレットキーをペーストする
- 「設定を保存」をクリックする
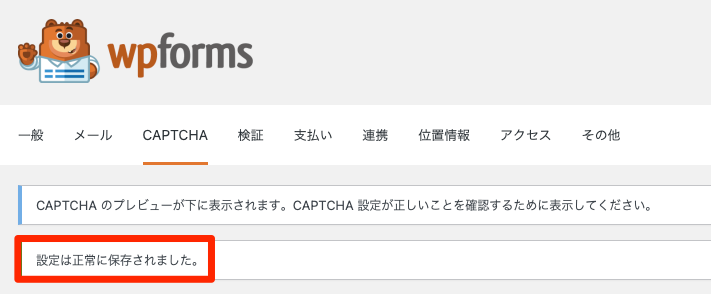
設定を保存したあと、しばらくすると「設定は正常に保存されました。」と表示されます。
 まさる
まさる表示されれば連携完了です。
reCAPTCHAをフィールドに追加する
Contact Form by WPFormsを開いて、reCAPTCHAをフィールドに追加しましょう。
「WPForms」→「作成したお問い合わせフォーム」
下記の手順でreCAPTCHAをクリックします。
- フィールド
- フィールドを追加
- reCAPTCHAをクリック

reCAPTCHAをクリックすると下記のようなポップアップが表示されるので「OK」をクリックします。
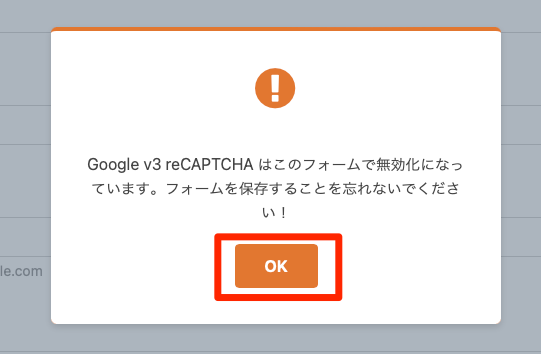
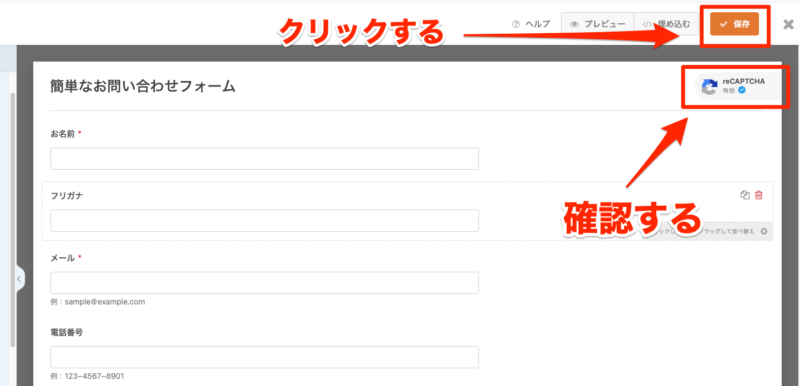
「OK」をクリックすると画面右上にreCAPTCHAのマークが表示されるので確認して「保存」をクリックする。
 転妻はりー
転妻はりー正常に設定されているか実際にお問い合わせを開いて確認します。
右下にreCAPTCHAのマークが表示されていれば、WPFormsとreCAPTCHAが連携されています。
 まさる
まさるお疲れ様でした!
これでお問い合わせフォームはあなたのものです!
転妻はりー疲れたわ!
でもカンタンだったわね。
Contact Form 7とContact Form by WPFormsを使ったことがありますが、Contact Form by WPFormsの方が断然カンタンです。
まさるこの記事を参考にして「Contact Form by WPForms」で作って下さいね!
お問い合わせフォーム作成でよくある質問
まさるここからはお問い合わせフォーム作成でよくある疑問にお答えしていきますね!
WordPressでお問い合わせフォームを作るのは難しいですか?
いいえ、プラグイン「Contact Form by WPForms」を使用すれば、簡単にフォームを作成できます。
まさる以前はContact Form 7を使っていましたが、WPFormsの方が簡単なのでオススメですよ!
Contact Form by WPFormsを使用するメリットは何ですか?
メリットは次のとおりです。
- 直感的な操作で簡単にフォームを作成できる
- 豊富なテンプレートから選択できる
- WordPressの管理画面から簡単に管理できる
- フォームのデザインやレイアウトを自由にカスタマイズできる
- フォームのセキュリティを高められる
まさる特に簡単に作れるのがいいですよ!
この記事を参考にして作ってくださいね。
WPFormsで作ったお問い合わせフォームをブログに配置するにはどうすればいいですか?
作成したフォームには専用のショートコードが発行されます。このコードをブログのページや記事に貼り付けるだけで表示できます。
まさるもしくは、この記事で解説しているように、ブロックエディタから呼び出すこともできますよ。
設定方法を見てみる(解説している箇所に飛びます)
WPFormsのお問い合わせフォームから送信されたメッセージはどこに届きますか?
スパムメッセージを防ぐ方法はありますか?
メールアドレスを公開せずに、読者からのメッセージを受け取る方法は?
次の方法があります。
- お問い合わせフォームを設置する
- SNSでメッセージを受け取る
WPFormsを使えば、メールアドレスを公開せずにお問い合わせフォームを設置できます。
まさるこの記事を見て一緒にサクッと作ってしまいましょう!
WPFormsで複数のお問い合わせフォームを作ることはできますか?
可能です。
まさるとはいえ、いくつも作る人は少なそうですが……
まとめ:Contact Form by WPFormsでさっさとお問い合わせフォーム作っちゃおう
本記事では、Contact Form by WPFormsでお問い合わせフォームを作成する方法を解説してきました。
- Contact Form by WPFormsを使用すればカンタンにお問い合わせフォームを設定できる
- スパム対策にreCAPTCHAが有効
- 10分あれば設定可能
- 円滑なブログ運用のためにお問い合わせフォームは必要不可欠
Contact Form by WPFormsはSWELL開発者の了氏が推奨する、シンプルなお問い合わせフォーム作成プラグインです。
お問い合せフォームはが設置されていないと、ブログの信頼性は大きく損なわれてしまいます。
きっちり設置されていれば、クローズドASPからのスカウトや仕事の依頼などがくることも。
まさる実際に僕もクローズドASPのスカウトが来ました!
転妻はりー羨ましいわ!
私も設置してスカウトされる!
まさるこの記事を参考にして、あなただけのステキなお問い合わせフォームを作ってくださいね。
最後まで読んでいただきありがとうございました!

コメント